Friday, March 29, 2013

2013 Goals: March Update

When I decided to publish my goals for the year 2013, one thing I was looking forward to was the accountability I would receive from my readers! To keep myself on track, and let you know the areas I've been working on, I'm posting an update today from the month of March. I'd love to hear how you are progressing with your goals for 2013, whether you set several or even just one!


Spiritual goals: {this is the most important area for me!}

Draw closer to and be more like my Saviour. I know this sounds vague and non-specific, but at the end of 2013, I want to be able to say that my relationship with Christ has deepened over the year. If I accomplish nothing else all year but this, 2013 will be worth it!

      **Ongoing goal

Finish memorizing Philippians. I have the first chapter completely down, and half of the second. I need to be more intentional about plugging away at this!

      **I’ve made it all the way through chapter 2! Yipee! Chapters 3 + 4 are shorter than 1 + 2, so hopefully those won’t take me as long. {crosses fingers} Any tips for a good way to keep reviewing chapters 1 + 2?

Memorize one other book {or a section of 6 other chapters} from the Bible. After I finish Philippians. :)

Continue to record my 1,000 gifts.

      **Continued this throughout March, and also started reading the book!! Woot!


Read through the Bible twice. This takes a bit of explanation. I have read through the Bible once in a year before. This year I decided to try it twice. I heard recently that reading through the Bible in one year only takes 11 minutes a day. So in less than a half an hour a day I should be able to read through it twice! All I am doing is reading 6 chapters of the Old Testament and 2 of the New Testament each day, in addition to a more in-depth Bible study. I think doing this will deepen my knowledge and understanding of the Bible, and make me even more familiar with it as a whole!

      **Doing well on this, and enjoying it! I'm currently in I Chronicles in the Old Testament and Acts in the New Testament.


Personal goals:

Purge and consolidate things in storage. Seems like I do this each year, but I am continually dissatisfied with how much stuff I have sitting in the attic untouched. If I don’t use it year after year, why do I hang on to it? I’d like to set aside a small amount of keepsake items and toss/donate the rest.

      **Worked on this some in March

Read 36 books. I easily read 2 books a month last year, so how about 3 this year? I also kind of dropped off the Booksneeze bandwagon, so I’m going to start doing those more as well.

      **Finishing up my last book for March. I read Grace for the Good Girl, The Secret Symbols of the Dollar Bill and am finishing 1,000 Gifts. Reviews coming soon - you can watch for them here!

Work on being a better correspondent. I think I improved in this area last year, but I still could do so much better. I’ve enjoyed hearing from some of my readers over the last few months as well, thanks guys! I’m also thinking about going back to some pen-and-ink corresponding - living life on the edge, I know - so we’ll see what I actually accomplish there.

      **Did some emailing this month.

Make daily exercise a habit. I had a good thing going for a while, but didn’t keep it up. Still trying to figure out the best way to make this work for me - you know I’ll keep you posted!

      **I went for a walk one time this month. Once. Hey, we’re still getting snow storms. So I’m cutting myself some slack. :)

Make music practice a habit and priority. Confession: I never practice piano. Right now in this season of life there is nothing I need to practice for - which is truthfully kind of nice - but I still could stand to improve and be stretching myself further. I also have a violin and guitar that sit untouched, that I would really love to pick back up. Vocal practice wouldn’t hurt me either. So there is plenty I could be doing - I just have to figure out a system that fits in with our noisy schedule. :) {With 3 others practicing piano, plus practicing for church specials and a baby that takes naps, I’m not sure how this is going to work, but we’ll see!}

      **Started working on this for a few minutes several days a week. So far so good!

Continue to work on rising early. The Christmas season threw me for a loop...need to get back on track with this! I’d love to be able to call myself an “early riser” by the end of 2013!

      **Didn’t do so well in March. :( Every time I get a cold it seems to set me back.

Start a journal and write regularly. I’d love to do better about recording life happenings, plus I think this would improve my general writing approach as well.

      **Ahhh, started this and am loving it. It has turned into a daily life/spiritual journal, and I am finding tidbits to record on a regular basis. You can read some of my thoughts on journaling here.


Blog and Shop goals:

Continue to blog 5 days a week. Some weeks it is more or less, depending on what is going on, but on a consistent basis 5 posts a week seems to work well for me and this blog’s community.

      **Continuing to reach this goal.

Have monthly planning sessions with myself to think and plan ahead. I continually find myself not adequately prepared to blog about a certain holiday or event...I need to take the time to sit down and see what is coming up in the near future. {hello valentines day}

      **Did this in March...love this time spent intentionally planning!

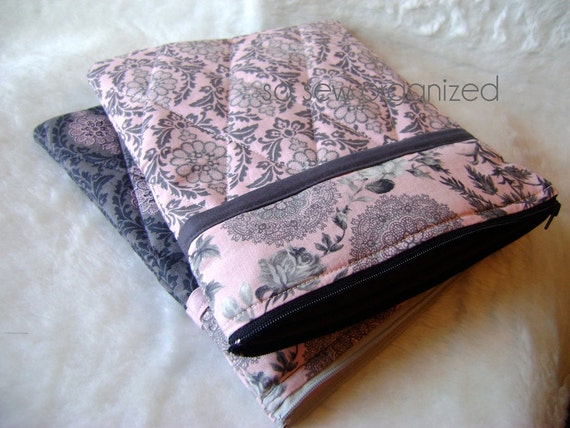
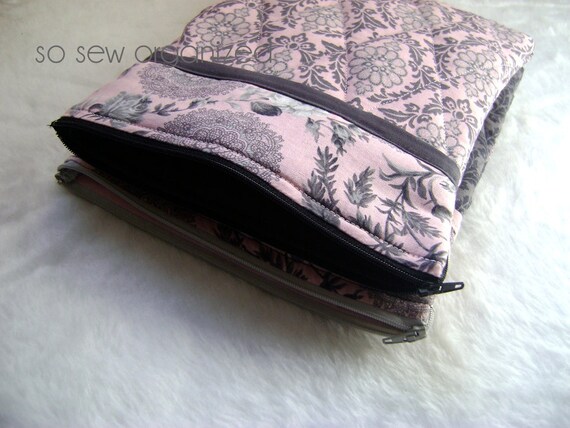
List new shop items once a month. I have some fun, new things planned for the shop, so stay tuned!

      **Listed a brand new shop item this month: Tablet/eReader sleeves! Did you know I have them available to fit any size?

Post some new blog features and grow this online community...I have specific goals set in these areas, but don’t want to be a total spoil-sport. :)

      **So exciting...this month I started sending a weekly newsletter that shares upcoming events, blog news, and lets you in on shop updates and sales. You can sign up by entering your email addy in the form at the top of my right sidebar! So far this newsletter has been a great way for me to further connect with you lovely readers!

Write out {and share} my blog purpose statement. I’ve been pondering, “why do I blog” for some time now...and feel ready to actually map out my purpose behind blogging and where I hope this blog will {and won’t} go. In the meantime, I’d love to hear why you read this blog...what do you enjoy most...what would you like to see more of? Thanks, your feedback would be much appreciated!

      **Haven't started this yet

Have you set any goals - big or small - for 2013? I'd love to hear about them! Thanks for helping me out on this journey!

Thursday, March 28, 2013

Home Improvement: DIY Homemakers Edition {March Party}

Welcome to our third monthly Home Improvement party! I am so excited to see what great improvements you have made to your home this month!

Home Improvement banner

Here are the super simple rules to make this a fun party zone...

  • Link up any type of post that has made an improvement to your home this month - a project, organizing effort, cleaning system, new recipe, planning or list making, or even a topical post like couponing or child-rearing. Basically anything goes!
  • Feel free to link up as many posts as you’d like, as long as they are recent {we’ll say anytime in March to be fair}
  • Include a link back here somewhere in your post ~ feel free to use this button if you want!


home improvement button
Grab this button

Don’t have a blog? We’d love to have you share the details of your recent home improvement in the comments!

Let the party begin! I can't wait to see what improvements you have made. Thanks for participating!


Wednesday, March 27, 2013

Project Isaiah

One of the things I love about the internet is the ability to share powerful stories, needs of others, and exciting opportunities at the click of a button. Today, I’d like to share a story that fits all of these categories… and provide YOU with the opportunity to make a difference!

There is a 13-year-old lad that lives in our rental house in North Carolina. His name is Isaiah.


Several weeks ago, Isaiah was playing innocently with his friends. They were playing hide-and-seek. Isaiah was climbing a tree, and fell out.

After several weeks in the hospital, he is soon being released - in a wheelchair. He is permanently crippled from the waist down as a result of this accident.

Accident? Or...plan of God? Ever since this event took place, Isaiah has used his circumstances to point others to Christ.

Even while he was being taken to the hospital in the ambulance, he pointed and told the paramedics, “I go to church down that road. Do you go to church anywhere?” He has looked for every opportunity possible to use this situation to point others to Christ.

And his story has had a huge impact in the community. One family, on their way to visit him in the hospital, stopped at a steak house to pick him up a steak dinner. When the owner of the restaurant heard who it was for, he gave it to him free...and promised him another when he was out of the hospital.

This kind of giving and sacrifice has been seen again and again by the people of Shelby, North Carolina...and now, YOU have the opportunity to give to Isaiah and his family as well!

The expenses that have come as a result of this accident have been overwhelming, I’m sure. Isaiah’s life and the life of his family was completely changed in one moment of time. They have had to move from the mobile home they lived in to a wheel-chair-accessible home. (We’re honored to be a part of this!) There are, I’m sure, doctor’s and hospital bills to pay. Besides being mentally and physically overwhelmed, I am sure there is a monetary sense of being overwhelmed as well.

A group of people who are set up to be of assistance to Isaiah’s family through all of these changes have organized a spaghetti dinner as a fundraiser. This money will specifically be going towards the purchase of a wheel-chair accessible van for Isaiah’s family. Tickets are $10 per person. The great news is, you can purchase a ticket to help the family out, even if you do not live in the area and cannot attend the supper. What an easy way to show God’s love to a family in need at this time!

For those of you in the Shelby, NC area, I’d encourage you to purchase your tickets and attend the event, which will be April 6th at the LeGrand Center in Shelby from 11am to 7pm. The monetary support is greatly needed...but the physical support of your  presence will bless the family beyond measure!

You can like the Project Isaiah page on Facebook to learn how to purchase your tickets and support this family. To learn more about Isaiah and how his general health is progressing, you can read his Caring Bridge site.

Thank YOU for what you can contribute to this family!!


Tuesday, March 26, 2013

Cleaning the Loo

Let’s face it: the bathroom is probably the one place in the entire house that we hate cleaning, but needs it the most. It is not the best job to have to do, but the results - and the peace of mind that it is sparkling clean - are so, so worth it.

While I was in college, I worked summers on the housecleaning staff, and daily had to clean multiple public bathrooms. Let me tell you, what is worth than cleaning a bathroom? Cleaning a public one. {she says types as she shudders} Over the years, I’ve developed a pretty good system that allows me to quickly and efficiently clean a bathroom - and I want to make sure yours is clean, too. :)

To clean a full bath, you’ll need two rags and a good disinfectant cleaner. We use and love Shaklee’s Basic G, a disinfectant concentrate that is perfect for spaces like this. It is nice to know that you can clean your home without harsh, toxic chemicals...and still come out with a clean space!

You can also choose to use a separate toilet bowl cleaner, if you desire, and Windex to wash your mirror as needed.


First things first - and yes, you must go in order. The order of this process is everything. Spray one rag with disinfectant, and wipe down both sides of the doorknob, the lightswitch, and anything else that gets touched daily other than the various faucets and knobs. We’ll get to those in a minute. It wouldn’t be a bad idea to wipe down cabinet door handles or drawer pulls or the sides of your vanity that get touched to open the doors. Anything that little grubby hands might touch. :)

Next, spray down the entire commode with disinfectant spray. This is one reason I love using an all-natural cleaner...you can use lots of it and it won’t hurt you. :) Spray the handle, both sides of the lid, and both sides of the seat. Spray the edges and sides of the bowl. If you are using a separate toilet bowl cleaner, squirt that on the inside sides of the bowl (did you follow?)

Using the same rag that you first used to disinfect, begin wiping down the toilet. WIPE THE HANDLE FIRST. I can’t emphasize that strongly enough. I don’t have to explain why...it should be obvious. :) After the handle, work your way down. Wipe both sides of the lid, then the seat, and lastly the bowl. Don’t forget to wipe the outside of the bowl and even dust off the base. For that matter, it wouldn’t be a bad idea to wipe the floor around the toilet. You never know where germs can land. :) When you are done, use a bowl brush to clean the inside of the bowl, being sure to get under the edge good.

Your toilet should shine. :)


You are {clearly} done with this rag. Throw it in your hamper.

With your second rag, clean your mirror if it needs it. If not, go straight to your sink. Spray it down well with disinfectant. Begin by wiping the faucet and knobs. If these are a shiny finish, they will appear cleaner if you wipe them with a pretty dry rag. A damp rag will leave streaks. So do these first. Then just wipe down the rest of the sink.


Next use this rag to finish up in the tub and shower. Spray down the knobs and faucet with disinfectant, and also spray some on the bottom of the tub. Turn on the faucet, and use lots of water to wipe everything down - the knobs, walls, and any ledges. Finish up with the floor of the tub. I like to use lots of water in the tub to make sure all the disinfectant gets washed away - otherwise it might make the tub floor slippery, and we know what a bad day that could be!

Aaaand...you’re done! Three cheers for a sparkling clean bathroom!

It is up to you to determine how often this needs to be done. Some days, wiping out the sink may be sufficient to get you by. In a family of 8 like ours, we need this full cleaning every day. Not that we are exceptionally dirty or anything...just that many people means that many more germs. Gross. :)

Do you have a method for a germ-free bathroom? How often do you give yours a full cleaning? Can you believe I spent a whole post talking about bathrooms? Weird…

Additional note: check out these fun bathroom printables - what a great reminder for your littles! I would love to use these in a bathroom some day!


Linked up with:


I Heart Nap Time

Monday, March 25, 2013

Gifts + Goals for the Week, March 25, 2013

Happy Monday, friends!

Trust you all had a great weekend...here we are at the end of March already! Goodness, this year is already going by so fast. This Sunday is Easter Sunday...and I'm looking forward to it!

Here are some of the blessings I added to my 1,000 gifts list this week:

531. Toddlers sleepy face
532. Abundant provision
533. Prayers of my family
534. Letting go of a fear
535. Seeing a friends first bump picture {a miracle from God}


What are you thanking the Lord for today??

******************************************************************************************************

I am thankful for a productive week last week! Here are the goals I set last Monday:

Write one letter

Continue reading “The Secret Symbols of the Dollar Bill” and “Grace For the Good Girl

Begin reading "One Thousand Gifts" by Ann Voskamp {recieved this as a gift from a sweet blogging friend this week! I can’t wait to read it!}

Memorize Philippians 2:30 and review all of chapters 1-2

Finish making bibs for a friend

Sort through one box in storage

Practice piano 3 days

Continue reading “Salvation ” - see my thoughts so far here

Work on mending pile

Be up by 8:00 each morning - uggh, I won't say how much this didn't happen!!


And here are the goals I am setting this week! I will be gone 4 days this week, so I'm keeping the list shorter than normal:

Write one letter or email

Continue reading Grace For the Good Girl and One Thousand Gifts

Finish reading Salvation as preparation for this Sunday - see my thoughts so far here

Continue to review Philippians 1+2

Start a sewing project for a friend

Work on mending pile

Go to Lockeport for a Good Friday Service


I'd love to hear what you are working on this week! Do you have any plans for this special weekend?


Friday, March 22, 2013

Sewing for Those who {think they} Can't: My Sewing Toolbox

 My grandparents gave me my first sewing machine when I was about 13 years old, with the promise of sewing lessons from my Grammie. I still use that sewing machine almost daily! I am ever-so-grateful to her for those invaluable lessons - I never dreamed that I would be running my very own handmade shop because of it!

At my very first sewing lesson, my Grammie gave me a kit she had put together of sewing essentials...things you must have to begin your sewing career! So whether you are making sewing your life’s calling, or just putting together a simple sewing kit that will get your mending done, this list is for you. These are the items you simply can’t live without!


*********************************************************************************************************

Scissors


>Regular shears - this may be a no brainer, but keep those babies separate and ONLY USE THEM FOR SEWING! Nothing dulls your shears faster than using them on paper, so have a pair that are set apart just for fabric and thread. I also like to have a small pair to clip threads, they are a little more convenient around the sewing machine.

>Pinking shears - when you cut fabric with these, it keeps things from getting all frayed. I don’t find that I use mine much because I have a serger, but you’ll want them for cutting out pieces of cloth.

>Rotary cutter - if you are going to be mostly sewing clothes, you probably won’t need a set of these. But if you plan to do quilts or something else with lots of straight lines, these babies will take loads of time off your prep time. Lets hear one for time savers!

*********************************************************************************************************
Needles


>Machine needles - generally these come in a package like those seen above. There are different kinds of sewing machine needles, but these 80/12 ones are the “normal” ones for general sewing.

>Needles for hand sewing - just a basic pack of assorted sewing needles will do the trick

*********************************************************************************************************

Pins


>Straight pins - You’ll want both longer ones and shorter ones, all with colorful round heads. These are much easier to work with than the small, all silver ones.

>Safety pins - I use these primarily to turn things inside out. Some day I’ll show you how I do that. :)

>Pincushion - in the very first picture, you can see I own one of those tomato pin cushions that every seamstress has. Seriously, I think it is written in the sewing code of ethics somewhere. The truth? I don’t ever use mine. I prefer to keep my pins in a small flat container so I can easily grab some, or in a flat-bottomed pin cushion. I find that the tomato one tends to roll away when you try to stick your pins inside! So yes, I own one...but don’t use it. Do whatever you want with that information.

Here is another secret tip about straight pins: I kept mine for years in a small container with a magnet in the bottom. It really helped keep those stray pins from getting away. {and they actually do sell magnetic pin cushions, so the idea is not original with me.} After a few years of storing them that way, the pins themselves started acting like magnets, which is what happens to metal that is stored by magnets. So now they stick to each other, grab on to my scissors, and anything else that is metal. This is so helpful! It really keeps them from rolling around so easily and falling on the floor...which is kind of like a “safety first” measure since Judah plays on my floor quite often.

{How many times did I say “magnet” in that sentence? Magnet, magnet, magnet…}

*********************************************************************************************************

Measuring devices


You will use any or all of the following items, depending on what kind of sewing you are doing:

>yardstick

>ruler

>measuring tape

>6” ruler - I wasn’t sure what this was called, but it is that small ruler in the picture above. This is great for measuring hems and smaller things.

*********************************************************************************************************
Other Sewing Extras


 >Chalk or marking pens - chalk is my favourite thing to use to mark on fabric with, because it brushes right off when you are done! Pictured here is a chalk pencil from the craft section, but just a regular ‘ol piece of chalk works fine.

>Seam ripper - you will need this. Promise.

>Fray check - great for sealing the ends of ribbons, ties, or any area that might fray and cause a problem.

>Quality thread - I have found that buying quality thread makes a huge difference in how well my sewing machine runs, and how well the item holds up. I typically use Coats and Clark or Gutermanns. (Gutermanns has a lot more color choices, which I love)

For your sewing machine, you also must have small screwdrivers and machine oil. Some day, we’ll talk about oiling your machine and keeping it in tip top shape.

*********************************************************************************************************

There is my "staples list" that I keep near my sewing machine at all times! If you don't machine sew, you can pop all of these items in a pretty basket or bin, and use it for mending and repairs. It is a necessary thing to have on hand! It would also make a great bridal shower gift!

What are your #1 tools for crafting or sewing? Did I leave anything out of this list? Any topics you'd like to see my cover in future sewing lessons?


Linking up with: Threading my Way

Thursday, March 21, 2013

Blogging News and Updates

Today’s post is just going to be a hodge-podge of random blogging info, because I have some exciting (and not so exciting) things to share about changes that are being made! So, I decided to cram them all into one boring post and call it a day. Ok? Hopefully you can stick with me to the end!

Item #1: Home Improvement Party

Yup, its that time again.. Time for our monthly Home Improvement Linky party! I had a blast seeing the super creative ways that you improved your home last month, and I’m excited to see what you have to link up this month! {note: all the participants last month also got a Facebook mention, so maybe that will give you a little motivation to get your party on?}

Remember, you can link up ANY type of improvement you’ve made to your physical home, or your way of living over the month of March. Our party is going to be held next Thursday, March 28th and will go live at 8am. EST. So head back over here then to link up your blog posts from the last months, or share in the comments section the improvements you’ve been making to your home!


Item #2: Newsletter

I’m always dreaming of new ways to make this blog’s community a fun, helpful place. One of my dreams has been to incorporate some kind of newsletter with behind-the-scenes info, news updates, and just more general randomness! Through the newsletter you will be the first to receive news about shop updates and sales, reminders about linky parties or other challenges, and other fun things I dream up along the way! I started sending a newsletter at the beginning of March to a handful of people that have shown interest in my blog or shop in the past. I originally thought I’d be sending this out as an email once every two weeks, but I can clearly see its going to be a weekly thing. :) So I’d love for you to sign up, and bear with me while I get the hang of this thang. So far it has been fun and I’ve had some great feedback, so I hope you’ll join in! You can join by simply leaving your email in the handy little box in my right sidebar {the one that says, "Subscribe to the Newsletter."}

Oh, and from now on, anyone who signs up for the newsletter will receive a free Home Management printable. Yay for free stuff!

Item #3: Boo for Spam

Over the past few months I’ve been getting what to me seems like a totally unreasonable amount of spam comments. Thankfully, none of them have had bad content, and my spam filter has caught most of them. They are actually quite hysterical sometimes… things like, “Great post, man!” or “Hey, you blog about the same sorts of things as I do” and then a link to their skateboarding site. Really? Skateboarding?

Lately, these comments are getting more and more frequent (sometimes 20+ a day!) and my spam filter has stopped catching them all. So daily, I have to come to the blog and delete 4-5 spam comments from my most recent post. That is obviously NOT what I want my readers to be greeted with when they come to my sight, and I personally think it deters you from leaving true, genuine comments {which I love and appreciate!}

So unfortunately, I am going to have to turn on that dreaded Word Verification for my comments. I absolutely hate doing it, because I hate that word verification myself on other blogs! {is it just me, or are some of them impossible to read?} Hopefully this will stop the spambots from coming to my blog,and after a time I can turn it back off. But for now, you all will have to bear with me, and verify that you are not a robot to leave a comment.

I hope that this doesn’t deter you from leaving comments, because I love, love, LOVE receiving each and every genuine comment from you sweet readers! It absolutely makes my day! So please stick with me. :)

Okay, back to more fun stuff...

Item #4: Pinterest Book Boards

You know that reading is one of my passions in life {right up there with drinking coffee} and I love finding books with great content that I can recommend to others. Each month in my Hot Happenings recap posts I share the books I’ve recently read and a brief review. Now you can find those same recommendations on my Pinterest board, “Books I’ve read {and recommend}.” Original title, no? I’m still working on adding to this board, but I hope you’ll head on over and follow along to get some great book titles to add to your reading list.

I also am working on a board of books I want to read...and I’d love to hear what books you recommend! I think organizing my reading in these two categories is going to be so convenient!


Okay, I’m done my rambling. Thanks for sticking with me this long! What are your thoughts in regards to these four items? Anything I could do differently to make your blog reading experience better? I love working to make this blog a fun, helpful place to be!

Psst! Don’t forget to head over and enter to win Leah’s giveaway! My tablet sleeve is one of the giveaway items, as well as some adorable handmade baby + toddler gear from 3 other handmade shops. You don’t want to miss out!

Wednesday, March 20, 2013

Preparing my Heart for Easter


Many of you probably know that I am a contributor over at Imperfect Homemaker, a blog about Christian homemaking, Homeschooling, and natural living. I'm posting over there this week about Easter and how I prepare my heart in the weeks leading up to that day.

Here is a sample from my post:

March 31 marks a very special day in all of our lives. For some, it is simply a day to usher in spring…with bunnies, lambs, candy and fun games. But for every born again Christian, it is an important celebration of the coming of The Lamb, the Savior of the world.

Ever since 2011, I have made it a point to not let that day come and go as just another holiday...

Click here to read the rest of my post!


A SUPER Fun Giveaway {Oh look, my tablet sleeves!}

My sweet friend Leah blogs at Embracing Grace. She has, just in the last year, built up a fantastic blog that ministers to a community of women that are seeking to serve the Lord. I just love her blog and the spiritual encouragement she shares!

Today she has launched a BIG giveaway, with four different handmade shops participating!! Lets here it for handmade!! Entering is easy, and you'll love seeing the goodies from the shops that are participating. One item you may recognize...


Oh yes, she is giving away one of my new tablet sleeves! I am so excited to share one of these with a lucky reader! Will it be you??

Head on over to her giveaway post to get in on the goodness! And while you are at it, lets give a shout-out to handmade items! Because really, aren't they the best??


Tuesday, March 19, 2013

How to Fold a Fitted Sheet {Yes, you can do it!}

There is a sign floating around somewhere on the internet that says, “Life is too short to fold fitted sheets.” It makes me laugh every time I see it, because I don’t mind folding fitted sheets, and neither does it take very much time! Yes, I am that person...the one that folds the contents of her sock drawer. I can’t help myself. :)

How would you like to be that person too?? I hope you do, because today I’m going to show you how to conquer the seemingly impossible task!


We’re going to take a double sheet from this:


To this:


We all know what the problem area is with those dreaded fitted sheets...the “round” corners that make it impossible for the sheet to lay flat and folded! Or do they??

Actually, it is possible to get that fitted sheet to lay down nicely, and it is no harder than folding the flat sheet...promise! Just make sure you have a flat surface, like a bed or table, to help you...that is key!

Just start by finding the two corners at the top of the sheet (where your head would lay if they were on the bed.) For this demonstration I used a pair of striped sheets, which makes it easier to know which way they go.

Once you’ve found the two top corners, stick your hand in the rounded part of the corner so you are looking at them inside out. That is important, the corners need to be inside out at this point.

Stick your pointer finger right into the “corner” of that sheet...where the seam comes together to make it fit over your bed.


Now, touch your fingers together so those two corners are touching.


Turn one side over the other so that now both corners are laying together with the back sides together. You should now be looking at one corner right side out.


Straighten out the rest of this end of the sheet so it is laying together. Now repeat those steps with the bottom two corners of the sheet. You should now have a fitted sheet folded in half the “long way.”

Repeat these steps to fold the sheet in half the other way. Now all four of the corners should be laying together nicely. Lay it out on your bed or table and straighten the sheet out so it is all laying nice and square. Here is what mine looks like at this point:


Here is a close-up of what I did with the rounded corner part:


As long as you have those four rounded corners all laying together nicely, this part is not hard. It practically lays down by itself. Just fold over the edges of the sheet to help it all lay down good.


The rest is a cake-walk. Fold it in thirds:


Then fold that in half.


That is it! Your fitted sheet is now folded nice and flat and square, perfect for stacking on a shelf in your linen closet!


Now you’ll want your flat sheet to lay the same, so here is a quick run-down on the best way to fold that flat sheet:

Start by folding it the “long way.” {Aka, find the top of the sheet (the wider hem) and fold those two corners together.} This makes a nice crease right down the center of the entire sheet, which you can then use to center the sheet on the bed when you make it.

Now fold it in half the other way as well.


Throughout this whole process, you want to know where that wider hem at the top of the sheet is. In the end, that should come out on the top of your folded sheet.

Now fold the sheet in half again, bringing the bottom up to meet the top, where that wide hem is.


Fold it in thirds:


Fold this in half (bringing the bottom up to meet the top again) and you’re done!


See how that wide hem at the top of the sheet is nicely visible? I think that not only gives a nice crisp look, but it also helps out when you put this sheet on the bed. You won’t have to rummage around wondering, ‘which way is the top?’ It is right there ready for ya!

Now your sheets are nicely, quickly folded, and ready to be used!


You can either stack these in your linen closet or another shelf, pop them in some pretty baskets, or store the sheets inside their pillowcases to keep everything together. Whatever way you decide to do it, having them nicely folded makes a huge difference! It also helps them be less wrinkled when it is time to use them.


So tell me, what is your take on folding sheets? Are you a fold-everything type of person? Do you feel better able to conquer your linen closet, now that you know it is really simple and easy? I do! Happy folding! :)

Linked up with:


The DIY Dreamer

Monday, March 18, 2013

Gifts and Goals for the Week

Happy Monday blogging friends! Hope everyone had a good weekend! I did, going away Friday and Saturday for a little friends hockey tournament. So fun, and we stayed in a hotel Friday night which was also very fun! It has been a while since I had an overnight stay like that...it is always nice to get "away!"

The blessings of the Lord have been abundant in my life recently. I am always so awed and thankful that the Lord chooses to bless little 'ol me and bring me even small things that I don't deserve. Here are some things I added to my 1,000 Gifts list this week:

520. Sunlight - longer!
521. First walk in the park this year
522. Listening to “my” waterfall
523. Book from a friend
524. Going away for a night
525. Fun friends
526. A sliver of moon through the clouds
527. A baby’s big smile
528. Sunset over the water
529. Sunshine-y days. {that’s a word...right?}


Last week, I was working on these goals:

Write 1 email

Finish “The Spiritual Secret of Hudson Taylor,” continue reading “The Secret Symbols of the Dollar Bill” and begin “Grace For the Good Girl.”

Memorize 3 verses

Continue reading “Salvation ” - see my thoughts so far here

Finish potholders and coasters for a friend.

Begin some bibs for a friend

Finish new shop item

Sort through one box in storage


This week, I'm setting these goals:

Write one letter

Continue reading “The Secret Symbols of the Dollar Bill” and “Grace For the Good Girl

Begin reading "One Thousand Gifts" by Ann Voskamp {recieved this as a gift from a sweet blogging friend this week! I can’t wait to read it!}

Memorize Philippians 2:30 and review all of chapters 1-2

Finish making bibs for a friend

Sort through one box in storage

Practice piano 3 days

Continue reading “Salvation ” - see my thoughts so far here

Work on mending pile

Be up by 8:00 each morning


It is promising to be a full week! What are you working on this week? Anyone else setting weekly goals?

Friday, March 15, 2013

Shop Update: Tablet Sleeves for iPad!! {squeal!}

You saw my newest shop product a couple of weeks ago...tablet/eReader sleeves for Kindle, iPad mini, and other 7" screens. Did you love them? Yes? Well good news...the same items are now available in larger sizes!


These sleeves are exactly the same as the smaller ones, with a layer of quilt batting and a layer of felt to protect your tablet and give some stability to the sleeve.


There are two similar sizes in my shop: one that will fit 9.7" iPads, and another that will fit Kindle Fire HD (8.7") or Nook HD+. If you have a different tablet or eReader and want to check the dimensions, just leave me a comment and I'll be glad to check it for you and let you know!

I don't have an iPad {yet!} but if I did, I can totally see myself slipping it into one of these well-padded sleeves and popping that into my handbag {I carry this one all.the.time.} It is great that you can carry everything in one handy bag, but know your electronics are protected against dings or scratches!

I already have a similar set up for my laptop, carrying it in this booktote. I absolutely loooove it! It is so easy to use and I know my computer is protected and easy to transport. Don't you just love it when a system fits your needs exactly? I do!


So tell me, do you have a tablet or eReader? What is your method to carry and go? Have you taken advantage of the sale in my shop this week yet?


Wednesday, March 13, 2013

You Don't Say!


A few weeks ago, I was chatting with my family. We were talking about Facebook.

More specifically, we were talking about what we don’t like about Facebook or the people that are on Facebook. {Don’t give me that innocent face...you don’t like people on Facebook, too. Admit it.}

In the course of conversation, I made this comment: “She is the.most.annoying. person to have as a Facebook friend.”

I didn’t mean it in a malicious or mean way. I didn’t mean that I thought she was a horrible person and no one should ever be her friend, on Facebook or otherwise. I just meant her posts were not up my alley, and I would have rather not had them cluttering up my newsfeed. That is all.

Three days later, I got word that she had passed away.

She was not a lady I knew very well. I had not even seen her for nearly 10 years. But I was convicted that the last thing I had said about her had been negative and unnecessary.

The Bible has so, so much to say about our words. We know and understand the admonitions against lying, deceit, anger, and other sins we can commit with our tongue. But what about negative, unnecessary, and idle words? Does the Bible have anything to say about those?

Oh yes, my friend. It surely does.

Proverbs 29:20
Seest thou a man that is hasty in his words? There is more hope of a fool than of him.

Ouch.

We could paraphrase that verse with the maxim, “Think before you speak!” It is so true! A similar verse says,

In the multitude of words there wanteth not sin: but he that refraineth his lips is wise.
Proverbs 10:19

Are you about to say something about someone else? Just stop. Many times you will change your mind! Are you babbling on just to make conversation? Just stop! There is an old quote that says, “Better to be quiet and be thought a fool, than to open your mouth and remove all doubt.” We would be a lot better off if we followed that truth! So many of our words are just simply unnecessary to say out loud...stop them before they come out!

The verse that perhaps convicts me the most in the area of my speech {and thoughts!} is Philippians 4:8

Finally, brethren, whatsoever things are true, whatsoever things are honest, whatsoever things are just, whatsoever things are pure, whatsoever things are lovely, whatsoever things are of good report; if there be any virtue, and if there by any praise, think on these things.

If the thoughts I am thinking about others are lined up with the criteria in this verse, those idle, unnecessary words are not going to come out of my mouth. On the flip side, if my thoughts are not lined up with this list, they are probably sin! So therefore the words that follow those thoughts are sin as well. How convicting!

Lets take a minute and examine our words based on these criteria:

Are my words true? Or am I telling a falsehood?
Are they honest? Or am I using flattery to win friends?
Are they just? Are they fair to the other person?
Are they pure? Or am I saying this with a double meaning?
Are they lovely? Will they edify the other?
Are they of good report? If they are repeated, with they still line up with these criteria?
Are they virtuous? Am I explaining the way of God more perfectly? (Acts 18:24-28)
Are they full of praise? For God and for others?

Convicting? Oh yes. So much so, that it is hard to read that verse!

But necessary? Oh, abundantly so. We would all do well to check our words with this verse on a regular basis.

One final verse to ponder as we consider this important topic:

Proverbs 21:23
Whoso keepeth his mouth and his tongue keepeth his soul from troubles.

God’s word gives us the answer: we can keep ourselves out of trouble by keeping a check on our tongue and the words we speak.

I am often convicted about my speech, even to the extent that I have made this topic a deep study many times over the past few years. Every time I study what God’s word has to say on the subject, and am convicted and challenged about another area that needs work. Clearly, I still have a ways to go. :) Will you join me in carefully examining your own speech, and seeing if your words line up with Scripture?

Let's be known as wise women by the words that we say...or don’t say!

Proverbs 31:26
She openeth her mouth with wisdom, and in her tongue is the law of kindness.


Tuesday, March 12, 2013

Sewing for those who {think they} can't: Make your own Potholders!

 Ready to learn something new? Today I’m going to teach you how to make your own potholders!


I enjoy sharing sewing tutorials with you all. Sewing is {obviously} something I really enjoy doing, and sharing it is the icing on the cake. I’ve posted a few tutorials in the past, and have had requests for more - mostly from some readers who are not very adept at the sewing machine.


So, this is the first of hopefully many tutorials in a series I'm calling "Sewing for Those Who {think they} Can't." Because the reality is...anyone can!

Today’s tutorial is a very basic, easy how-to that even a beginner seamstress can succeed at. I’m going to attempt to make things simple and plain, so you’ll be able to understand the steps!

And let me say this: I use an older, basic sewing machine {which I know and love the best}. There are a lot of newer, more complicated machines that I really don’t know anything about. Not all sewing machines are created equal. :) So this tutorial is presented with the assumption that you know the basics of your own sewing machine. If you have any questions, feel free to ask...I might be able to help. =)

Today we are going to make simple, square potholders. Materials you will need:

Your fabric of choice

Thread to match {we will be doing some topstitching so the thread will show}

Felt

I picked up this felt at Walmart for about five bucks:


Carefully cut two 10x10” squares of your fabric, and cut two 9x9” squares of felt. I put two layers of felt in the middle so it would be thick enough to be heat resistant...don’t need anyone getting burned!


It is so important that your squares of both the felt and fabric be, well, square...nice, straight lines. I have a fantastic cutting mat that makes it pretty easy {although I’ve found that felt is slippery stuff and never seems to come out perfectly square.} Just do the very best you can.

Lay both pieces of felt on the wrong side (back side) of one piece of fabric. Center the felt so there is ½” of fabric all the way around.


Now you will baste this together, which means to sew it on with your longest stitch. For my machine, it is a 6 on my stitch length dial.


When you baste, don’t let your stitches overlap, to make it easier to pull out later.


My tips for clean stitching:

1. As you prepare to sew a seam, lay your fabric down where you want it and put your presser foot down. Then immediately put the needle down into the fabric. 
2. With your left hand, hold your fabric near the foot, but also hold the ends of your thread down with a finger or two. 
3. Have plenty of excess thread pulled out of the machine to give you plenty to work with in step 2. 
4. Make two stitches, then two backwards, and then resume forwards again. This keeps your stitches from coming out. HOWEVER, in a basting stitch we want our stitches to come out later, so do NOT backstitch.

Pin this layer to the other piece of fabric, right sides {or front sides} together. Sew ½” on 3 sides and around the corners on the fourth side. Leave most of the fourth side open so you can turn this inside out.


Another clean stitching tip:

5. When you are sewing around something square like this, you do not have to backstitch, stop, cut threads, start over every time you get to a corner. Just stop with your needle IN the fabric ½ inch from the edge (or whatever width your seam is). Just eyeball it - you’ll get good at it after a while. Then with your needle IN the fabric (that is sew important!) raise the presser foot.

Turn your fabric on the needle until you are lined up for your next seam

And continue! So much easier then having to stop and backstitch every time!

Moving on…

Clip corners close to the stitching. Check to see if the felt is hanging over the stitching anywhere, and trim that back to reduce bulk. You want all the felt to be inside the square you just sewed. Of course, if you cut absolutely perfect squares of felt like me, you won’t have to trim it back. {I jest}


Turn the entire baby right side out, being especially careful to poke the very corners out. I like to use the tip of my scissors to do that.

Before you do anything else, iron everything down carefully, including the opening. This should lay down pretty easily.


Now its time to pull out those basting stitches. Normally these would pull out without hardly any effort, but because they are sewn through two layers of felt, you might need to enlist some help from Mr. Seam and his ripper. {that sounded way better in my head} Just pull out all that basting thread...you don’t need it anymore.

Now comes the best part of the whole process….TOP STITCHING!!! Ok, not quite, but I seriously love the look a nice straight topstitch gives. I like to go around twice...once right on the edge and once about 3/10” in.


And you are done! =) Give yourself a pat on the back!


While I was at it I decided to make some coasters to match. I just cut 5x5" squares of fabric and 4x4" squares of felt...and then did everything else exactly the same. The only thing different was that I only used one layer of felt inside.


The two rounds of topstitching give a nice, finished look to them, I think. The whole project is easy to do, and costs practically nothing! Give it a try and let me know what you think!


This has been the first lesson in "Sewing for Those Who Can't." Would you pin this and share it with others?

Thanks =)


I linked up with:

The DIY Dreamer