
I recently was asked to make valences for a friend of mine, the same one I made this tablecloth for. It was an easy, standard process, but I thought I’d break it down for you and explain my method, in hopes that this is a help to someone!

Perhaps the hardest part is figuring out the correct measurements to cut your fabric out. I have to admit, I did it wrong the first time around on this. Perhaps it is just my blonde roots coming out, but it seems to take me a LOT of thinking and measure to get it right!
Step 1 is to determine what the finished size needs to be. I was asked to make these for a pretty standard window, about 36” wide, and about 12” tall. Here is how that looks on paper:

But we don’t want to curtain to actually be 36” wide. There would be zero gather in the finished curtain, and it would not look nice! It would look like the curtain wasn’t big enough. So, some width needs to be added. Thankfully most fabrics are 42” wide, which is pretty much perfect for a standard window. I usually just use the entire width of the fabric! So now we have this:

That 42” also allows for a ⅝” hem on both sides as well. Now we have to add some seam allowance for the bottom hem, rod casing and heading. This is where it gets tricky!
Right off the bat I add 1” for the bottom hem. I use a serger to finish my edges, so I don’t have to worry about enough for a double fold hem. Just determine how much you will need for your hem and add that much. I like 1”, I think it gives a nice look to the finished curtain.

Next determine your heading size. That is the little ruffle of fabric that will be above the curtain rod when it is hanging. For a window and curtain this size, a 2” heading looks nice to me. So, add 2” more to our measurements.

Now figure out how much you need for the rod casing. I think 1½” is a good size for a normal small rod. It allows enough room to slide the rod through easily. So now I’m adding 1½” more to the measurements, plus another ½” for finishing that edge. Again, I just serge the edge, but you may want to allow a little bit more to fold under and create a neat hem.

Now we have finally reached a finished size! Woo hoo!
We’ll figure out the measurements for the lining in a minute, but first I like to get my curtain ready.
Once I’ve cut it out and ironed it well, I serge all 4 edges. Then I press each edge to make the hem, beginning with the sides.

The sides get ⅝”, remember. Then I do the bottom, a 1” hem, and then the top, allowing for the heading and rod casing. That is a 3¾” hem.

Why is it 3¾” you ask? Well, I allowed ½” for finishing that edge, which would have made it a 4” hem, but when I serged it some of that edge got chopped off to give a nice, straight line. So the hem ends up being 3¾” to make sure the actual finished valence side (what everyone will see when its hanging on the window) is 12 full inches. Clear as mud?
Now that all the hems are pressed down well, I can measure for the lining. This process is much simpler. I just have to measure my valence, making sure that the lining will tuck under each hem and get sewn into the seams.

That meant a 9¼” x 40½” lining. Depending on your fabric, you may want to extend the lining all the way to the top of the heading, just for continuity’s sake. I didn’t find it was needed with these, so I just made sure the lining was big enough to be sewn into the rod casing.
Pin the lining in place.

And while we’re talking about the lining, lets talk about the lining. :) I wouldn’t normally line curtains with patterned fabric like this, but I had it on hand from another project, it didn’t take too much fabric, and the pattern was so subtle that it really gave a beautiful look. Plus it matched perfectly. From the back (for someone looking in the window from the outside) I think this will make a nice look. The print-and-print look isn’t for everyone, but you won’t really see both at the same time anyway!
It was hard to capture the real beauty of this fabric. I just love it! It is simple and dainty, making a great accent fabric!

I decided to do mitered corners on the two bottom corners (using this method) to give it a clean finished look. I think the seam comes out so much nicer with mitered corners! Once they are all pressed down in place, I just sew down one side seam, and when I get to the corner, I put my needle down into the fabric and pick my foot up:

Then turn the fabric on the needle, lining up to sew the bottom hem.

Put the foot back down, and I can just keep sewing a continuous line! No stopping, reversing, cutting, and repositioning the fabric!

Don’t the mitered corners look great?

Next I sew the seam for the heading. Thankfully on my sewing machine the metal plate was exactly 2”, so following the edge of it gave me a nice straight seam.

The rod casing, not so much. I had no clear line to follow (and really didn’t want to rely on pins..takes a lot of time and still doesn’t come out super straight!) so I tried a trick I saw on Pinterest. I put a rubber band 3½” from the needle, giving me a straight edge to follow!
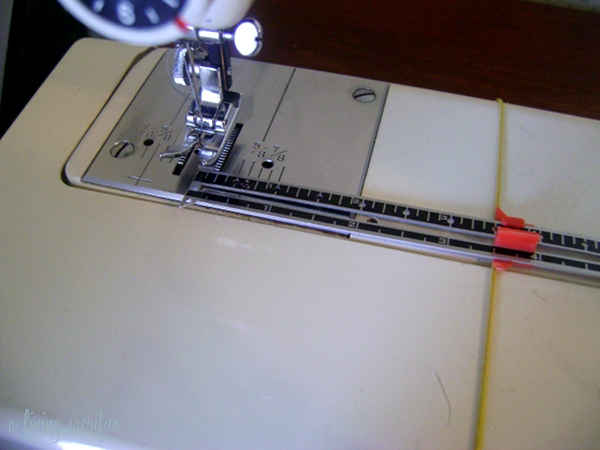
It worked great!

Here is the finished front side. See the nice straight lines for the rod casing and heading? Divine.

And that means the curtains are done!

Curtains are a comparatively quick project once you get all the measuring and cutting figured out! It is fun to create something from scratch and have it turn out so nice!
Have you made curtains or valences before? What is your favorite thing to create? Or are you a pattern-only kind of seamstress?

Hmmm...thanks for the tutorial. From someone who can't sew at all ;), I think I would give it a try. You should do a "sewing machine 101" or "sewing for people who can't" :D post with basic sewing machine instructions and terminology. :)
ReplyDeleteI just might do that! Sewing is "sew" easy, haha (sorry, couldn't resist!). I feel like I am at the bottom of the totem pole compared to some crafty people out there, so I am glad to be a help to someone else! If you ever try it and have any questions, I'd be happy to help!
Delete