
New here? I'm glad you are visiting! You may want to follow this blog so you don't miss miss a post!


Welcome to day 2 of our 31 Days series! Today our topic is the sewing machine.

Yesterday I showed you an {embarrassing} photo of me with my sewing machine 10+ years ago. Would you believe that is still the machine I use and love?
Today I’d like to give an overview of my machines, and show you the basic structure and elements of any machine. None are created equal, but each one will have many basic similarities. I’m also showing you how to care for your machine. Ready?
Here is my Kenmore machine:

This is an older machine, and quite simple as far as options go, but I
LOVE it. I use it most of the time, and just adore how easy it is to get
along with and the simplicity it offers.
Here are the components that all machines will have: {Note: this information will probably not apply to digital machines. About them I know nothing. Sorry!}
This simple machine has two options: sew straight or sew zig-zag. Oh yeah, and in reverse. Make that three.
Here are the components that all machines will have: {Note: this information will probably not apply to digital machines. About them I know nothing. Sorry!}
This simple machine has two options: sew straight or sew zig-zag. Oh yeah, and in reverse. Make that three.

1. Keeping the “width” dial set at 0 means straight stitching. A higher number will give you a zig-zag stitch in different widths.
2. The length dial controls how big the stitches are. The smaller the number, the bigger the stitch. {that’s not at all confusing, right?} Here is a little breakdown of when I use different stitch lengths…
2. The length dial controls how big the stitches are. The smaller the number, the bigger the stitch. {that’s not at all confusing, right?} Here is a little breakdown of when I use different stitch lengths…
- A 6 on my machine is a basting stitch, or a long stitch that is easy to pull out.
- 8 is my favourite. I use it on any topstitching and basically any time I can. I just think this length is picture-perfect. All the quilting lines on my totes and sleeves are done with this stitch length.
- 12 is a smaller stitch that is good for seams that will have some strain put on them. You know how some walls in your home can’t be removed because they are “load bearing” walls? That is how I like to think of this stitch. It is the “load bearing” stitch, which makes it good for clothing. I use it to secure the handles on my totes, for instance.
- This machine also has a 24 stitch length which is teensy tiny stitches. I don’t think I’ve ever used it. It would be murder to have to pick out.
Thirdly, the reverse button. Whenever I begin a seam, I sew a few stitches, then reverse back to the beginning and start again to reinforce the end. This keeps the stitches from coming out, which is slightly important! [wink!}
Here is a shot of the “working” end of the machine:

The arrow at the top is pointing to the presser foot tension. The arrow on the bottom is pointing to the upper thread tension. We’ll talk about those at a later time.
Here is the visible working parts of the machine. This is the presser foot. It has a lever in the back of your machine that lifts it up and down. If the presser foot is not down while you are sewing, you won’t get very far. :)
Here is the visible working parts of the machine. This is the presser foot. It has a lever in the back of your machine that lifts it up and down. If the presser foot is not down while you are sewing, you won’t get very far. :)

Underneath are the feed dogs, which is what pulls your fabric through the machine. The presser foot keeps your fabric pushed down against these feed dogs so it can get pulled through.
And of course, here the needle goes up and down. The most important part!
Here is where your bobbin thread and bobbin casing get inserted into the machine. If your machine has a bobbin that loads on top, yours will look different. I personally prefer this style better.

It is so amazing to me how the bobbin thread and upper thread work together to form a stitch! I mean, what genius thought up this system? When everything is functioning properly, it all works together so well!
I own another machine too...a Singer.

Here is the story behind why I own two machines. My Kenmore does not have a zipper foot or button-holer. Probably at one time it did, and probably at that time you could buy parts for it, too. After some unsuccessful attempts to find a zipper foot that fit, and several annoying trips to a friends house just to put in a zipper, I just went to WalMart and bought the most inexpensive machine I could.
This machine is really not all that great. It is a cheap machine - plain and simple. But it does what I needed it to do, and gets me by. As I said before, I use my Kenmore 90% of the time anyway!
It does have a few more stitch options…

And it also holds the thread a bit differently. I have to say I prefer the other way better, but this is a bit more compact.

There are a couple easy steps you can take to keep your machine working smoothly.
1. Oil your machine

You can find machine oil in the sewing aisle of Walmart or any craft store. Here are the points to oil:

The end of my machine {above the needle} just flips open. Oil the moving parts that make the needle go up and down.

These two holes allow oil to get down to the moving parts around the bobbin. Drop some oil in each of those.
Periodically, it is a good idea to open up your machine and oil every moving part you can find. It is not as scary as it sounds.
My machine is simple. Just unscrew these two screws…
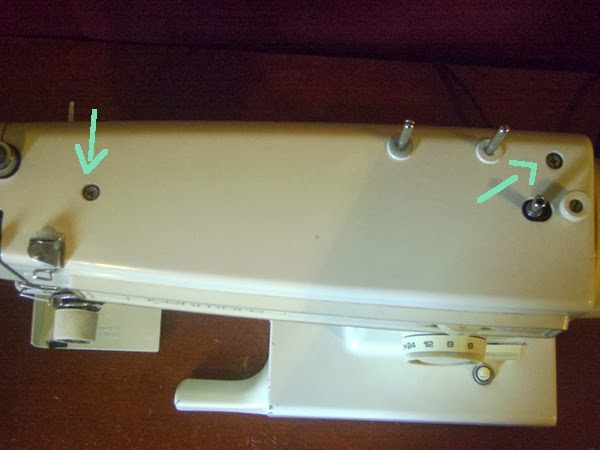
This allows the top to lift off. Drop some oil on any moving parts you see.

2. Keep the dust out
It is good to take a small brush {which may come with your machine - if not a makeup brush works great} and brush out the area around the bobbin casing. Lint and fuzz easily gets trapped in there.
Another place to occasionally brush out is underneath the plate where the feed dogs are. Just a couple of simple screws hold that in place - take them out, remove the metal plate, and dust around the feed dogs. You could take this time to oil any moving parts under there, too!
These two simple steps should keep your machine in good working order!
Challenge: Spend some time getting to know your machine. Have any questions? Ask them in the comments section! Has it been oiled lately? Show it some love! Then come back and tell us you did!
Other posts in this series:
Day 1: Introducing my craft

I can probably count the number of times I've oiled my machine on one hand. Awful, I know. I LOVE Kenmore, best sewing machines ever.
ReplyDeleteI'd have to say the same, even though this machine is the only experience I've had with Kenmore. And depending on how much you use your machine, it may not need much oiling. Thanks so much for commenting!
DeleteI don't know that I've ever thought about oiling my machine... :( oops!
ReplyDeleteDepending on how much you've used it, it may not need much oiling, especially since its new. It doesn't hurt it either though, so go ahead and give it some! You may find it runs a bit smoother!
DeleteThanks for commenting! =)