Wednesday, January 30, 2013

Home Improvement: January Party

Home Improvement banner


It is time for our very first Home Improvement linky party! I can’t wait to see what fantastic improvements you all have made to your homes lately!

Sometimes it is just a small thing that makes a huge improvement on your system. A tweak that leaves you thinking, “Why didn’t I ever do this before?” That was the kind of improvement I made recently that I am excited to share with you today!

I came to a moment where I felt I needed a better system. Ever been there? I had a drawer in my sewing desk full of note cards and candles {because you know, everyone stores those things together in a sewing desk} and it. was. full. Too full. And I wasn’t using the note cards….I didn’t even know half of what was in there, to be honest!

But in an effort to keep up with my goal of being a better correspondent this year - including real, hand-written notes - I determined to create a system I could use. I wanted to make it easy for myself to get those notes written, and provide good storage as well.

To begin, I emptied out a drawer in a shallow three-drawer caddy. {This was a great place to start, since I was able to find better homes for/get rid of the stuff that was cluttering up that drawer!} Then I pared down and organized the stuff I really needed, and - the fun part - filled up the drawer again in a neat, organized fashion!

work drawer 1


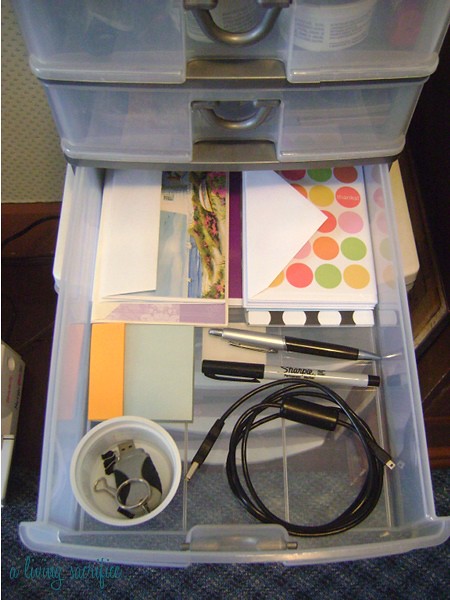
Here is a little bit of what it includes:

drawer contents


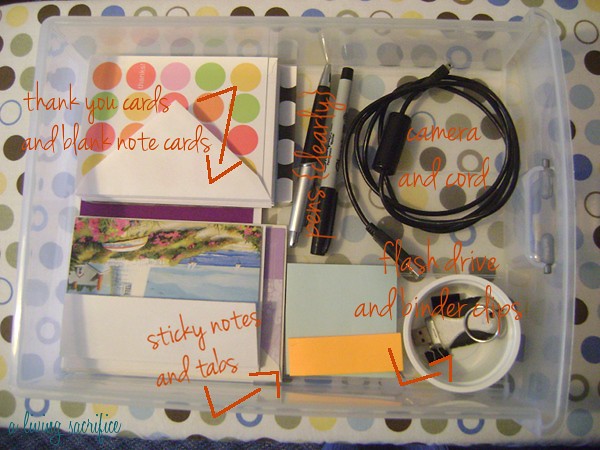
I decided I didn’t need the whole drawer for my letter writing, so I included a few blogging-and planning-related items as well. Things I can pull out as I need, but have a good, permanent place for the rest of the time.

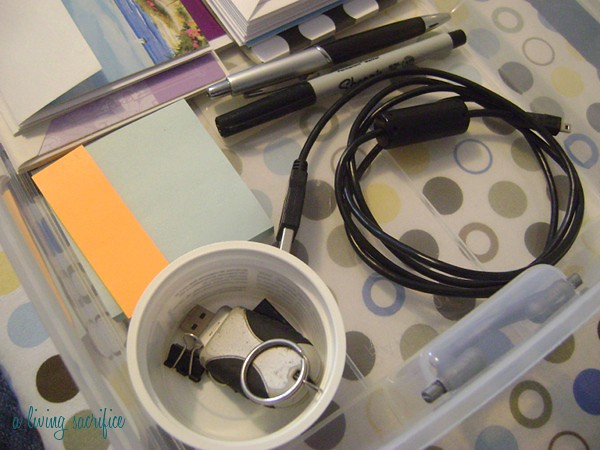
I popped in a stack of note cards and a stack of thank you cards, plus a pen and Sharpie so the tools I needed would be handy. The sticky notes allow me to create lists or reminders while I’m working, and I can use the sticky flags to pop notes into my planning binder or another handy place if I need to. My camera and cord did not have a permanent landing place, and needed one desperately, so this seemed perfect!

I just used a small re-purposed cup for some smaller items, and then came my most brilliant brainstorm: I used a dab of sticky tack to secure that baby so it can’t slide around. It has worked like a charm! {I promptly did the same thing in a bunch of other drawers around my room, ha!}

drawer close up


Now whenever I want to write a note to a friend, do some planning or blog-related work, I just pull the drawer out, plop it and me on my bed and get to work! I love the ease and simplicity of the system! It has certainly been a Home Improvement for me!

Now, I can’t wait to see what you have been doing this month to improve your home: the diy, homemaker way!

Here are the rules, so we can get this party started:

  • Link up any type of post that has made an improvement to your home this month - a project, organizing effort, cleaning system, new recipe, planning or list making, or even a topical post like couponing or child-rearing.
  • Feel free to link up as many posts as you’d like, as long as they are recent {we’ll say anytime in January to be fair}
  • Include a link back here somewhere in your post ~ feel free to use this button if you want!


home improvement button
Grab this button

Don’t have a blog? We’d love to have you share the details of your recent home improvement in the comments!

Thanks to everyone who participates for making this a fun party!!!


Tuesday, January 29, 2013

Project Organize: Home Office!

Since one of my goals for this year is to go through my stuff in storage, I decided to work on one aspect of that stuff each month until it is done. When Jen at IHeart Organizing issued a fun monthly challenge to get our home offices organized, I decided that was a great place to start! For me, this included paper storage, systems for dealing with various papers that come through my hands, and storage systems for those things I need to keep.

It is amazing how paper clutter can pile up. Y’all, I don’t even have a complicated life, but I still end up with so much stuff! There were several areas where paper and files were clearly taking over.

I started by attacking cleaning up my bookcase. Oh, I had the books and shelves pretty well organized, but the top - well, it was a disaster area if ever there was one. For years I had been using this big, ugly organizer that would work great behind closed cabinet doors, but not so much out in the open. I have never liked the look of it, but didn’t know what else to do with all that stuff! {You can kind of see it in the top of this picture from this project...but it actually doesn't look so bad in this photo}


Find a better system, thats what.

I got rid of a lot of things I didn’t need to hold on to, and moved the rest to the base cabinet of the bookshelf. That needed help too, but once everything was straightened up and organized, I had a nice, workable system.

organized supply cupboard


I don’t need any of these things on a daily basis, so this is a great place for them. And now that there are less things in here to get messy, I think I will be able to keep it neat! {fingers crossed}

Directly above the bookshelf, my memo board was my next victim:

clean memo board


It is amazing how many little bits of paper you can shove on these things! I pared down to just a few simple things - like the Bible verses and motivational quotes on the cork board. One slot holds an envelope for receipts, which I plan to go through monthly and toss the ones I don’t need to keep. Another slot holds my supply of Gospel tracts where I can grab them quickly, and a stack of business cards. The other slot is gloriously empty. I’m still decided what would be the best use for that space! {its nice to have options}

On the white board part, I sometimes write more verses, quotes, or something I need to remember. And sometimes my brother writes crazy notes on there. It is a fun little space to have. :)

Here is a shot of the memo board with the cleaned up bookshelf:

memo board wall


Oh look, there at the bottom are my new Booktotes...just waiting to be shipped to some of you! {wink!}

One thing that I found while cleaning out the memo board was a couple of owner’s manuals - from things I received last year for Christmas. Yeah, they had been sitting there a whole year. For shame, Nicole, for shame.

I already had a system for owner’s manuals, but it clearly needed to be updated. I use a big ‘ol binder and plastic sleeves. Each owner’s manual gets popped in its own sleeve and labeled with a sharpie.

label sleeve with sharpie


If something needs to be changed up, the sharpie wipes right off with a paper towel and a little Expo cleaner.

french press sleeve


This is a great place to store important little items, like extra flashlight bulbs…

sleeve with extra light bulbs


And it is also a great way to keep receipts in a place where you can’t lose them. Just keep the receipt for an item with the owner’s manual and any other important info, like warrantee/return information.

thick pages of manuals


It is a great system...when I use it! {hangs head}

Now that I’ve created some better systems for dealing with the various papers that come through my hands, I’m planning to keep it that way! I’m looking forward to implementing some more paper organization as I need to. It is nice to keep the paper monster at bay!

Psst: I'll be sharing another little home office-related project tomorrow for our Home Improvement linky party, so be sure to come back then and check it out!


I'm linking up today with the...

I Heart Nap Time


Monday, January 28, 2013

Gifts and Goals for the Week, January 28, 2013

Happy Monday! Trust you all had a great weekend. We've been having some COLD weather!! Thankfully today the temperature is *almost* back up to the freezing point, which feels spring-like and balmy to us, haha!

I had a great weekend, helping with a men's banquet at my dad's church on Saturday, and then ministering at my church yesterday. I am so thankful for the opportunity to serve the Lord, even in what seems like "small" ways. As the song goes, "It is a great day to serve the Lord!" =)

Did you see the new item in my shop this weekend?? These Booktotes have me all excited!!


They have matching laptop/tablet sleeves too. {So cute!} If you haven't already, head over here to check them out!

On with our weekly updates:

Here are a few blessings I've added to my 1,000 Gifts list recently:

509. A little baby’s laughter
510. My great brother {who fetches things for me when I’m already cozied into bed :) }
511. Kids laughter while playing games
512. Provision in tiny details
513. A big grown man holding a tiny baby {because really, can anything melt your heart more than that??}


Last week, I was working on these goals:

Write one letter

Memorize 3 verses - got two down

Continue to organize paper clutter/create better system

Complete new shop graphics

Continue reading Intercessory Prayer


Get up by 8:30 every morning - only missed a couple of mornings, which is an improvement already!

Decorate for men’s banquet

 
This week, I'm going to attempt to accomplish these goals:

Write one letter

Memorize 3 verses

Finish organizing paper clutter

Finish Intercessory Prayer

Get up by 8:30 each morning

Go to FGBC’s winter retreat

Finish some mending for a friend

Hem a curtain for the church

What will you be working on this week? Any mending or crafting project? How about memorization goals?


Saturday, January 26, 2013

Shop Update: Introducing So Sew Organized and the Booktote!

I am beyond the moon excited to be introducing some new products today, as well as the makeover that has happened in my Etsy shop this month.

Welcome to:


After much {and I mean much} deliberation, I finally settled on a new name for my shop, which I feel reflects the purpose of the shop far better than the old name did. As you may recall, the shop was previously in my name, which makes things kind of boring and monotonous if you as me. {Seriously, who is excited about a shop named nicolerisinger?? BORING!}

I sent out a plea on my Facebook page a couple of times asking for suggestions. In the end, I kind of combined a few of the suggestions to end up with the name “Sew Organized.” After mulling it over, thinking about how it would look on banners and business cards and such, and considering how easy it would be to find/remember for visitors, I decided I liked it.

Then I found out it was unavailable on Etsy. Ahhhhh!!!

At some point in the past, some other brilliant mind had a shop named “Sew Organized.” Even though the shop no longer exists, names are not allowed to be re-used on Etsy. {they explained that it would be sort of like stealing an identity, since that person could re-open the shop some day if they wanted to.}

Soo, to make a long story longer, I finally added the first “so” to the name, hence giving it its own personal twist, and so the shop “So Sew Organized” is born!

I’ve updated my shop policies and made a few other small tweaks, so feel free to browse over there for a while and let me know what you think!

But the most exciting part of today is introducing a totally brand new product to the So Sew Organized shop!!!

I’m calling it the Booktote.

Booketotes


This is my largest tote so far, at approx. 12x14” with a wider 2” bottom. As the name suggests, it is great for books and binders! Piano books and the like fit in here great, too.

Sweet nothings close up
"Sweet Nothings" design


Zoe close up
"Zoe" design


But keeping all of your interests in mind, it also features a matching laptop sleeve!

top shot of sleeves


laptop sleeves


Zoe booktote and sleeve


I have been using one of these great tote/sleeve combos for a couple of weeks now, and I seriously love it. The sleeve keeps computer safe, but I have a handy and lovely way to carry around my computer, planning binder, and any other things I need.

Sweet nothings with stuff inside


There is a handy pocket inside where I keep my camera, flash drive, a pen, etc. Sooo perfect for blogging!

There is one aspect of these fabulous new totes that scares me. Just being honest here folks.

It is this:

I’m deathly afraid that one of y’all is going to order this fun tote/computer sleeve combo and it arrives at your door and your computer doesn’t fit inside the sleeve.

Cue the whomp, whomp, right? Seriously, I’m uber close to have nightmares about it. So I’ve done boatloads of research about different computer sizes. Picture me with a dozen tabs open to things like “Laptop Buyer’s Guide” and “Comparison of Macintosh Models.” I wish I had one of every kind of computer out there to try them out in this thing, but of course I don’t.

So, I measured and compared and measured some more, and then tried fitting a bunch of different objects inside, just to be sure.

My laptop is 11¼x9”, but it is thicker than most with a whole 1¼” depth {it is a dinosaur, what can I say?} which takes up more room in a sleeve like this. However, it fits nicely with room to spare.

Sweet nothings sleeve with laptop


I grabbed the largest book on my bookshelf, and that fits inside perfect as well. It fills the sleeve the long way, but has some extra room width-wise. The book measures 8½x12x1”.

book in sleeve


I even stuck my planning binder in here, haha! It fit, but quite snugly all the way around. This is a ½” binder that measures 11½ x10”.

binder in sleeve


So, what I have come up with is this: This computer sleeve will fit computers/tablets with a 13” screen and smaller. A 15” or larger will not fit, if my calculations are correct. This size should also include tablets with a 9-11” screen. They will be all comfy in there with room to grow. Haha.

two sleeves open
{Just love the coordinating insides!!}
As with any items in my shop, the quantities are limited, so hurry over and snag one while they are still available!

If you are thinking about purchasing one of these great combos, but have ill-fitting-computer fears like I do, just shoot me a message with the dimensions of your laptop and I’ll let you know. I’ll measure every book in the house if I have to. =)

I know there are even smaller guys {and gals} out there, those itty bitty notebooks and smaller tablets, that would get lost in a sleeve this big, but never fear - I’ll have a word with the designer at So Sew Organized and see if she can’t arrange something in the near future. {wink!}

Creating new items such as these is always so exciting, and I am thrilled to be able to share them with you! I have more new items to come in the {near} future, which gives me all these butterflies in my stomach just thinking about it. I just love sewing and creating!

I'd love to hear what you think of these new items! =)


Organizing A Small Space


I'm privileged to be posting over at Imperfect Homemaker about organizing in a small space! Here is an excerpt from my post:

I enjoy organizing – taking a space, rethinking it, and deciding how that space could be better used. This time of year usually presents a problem, however… since I have recently been gifted new things, I have to find a place for those items as well! While I certainly don’t mind receiving new things, I am very limited on space. I’ve developed a few “rules” that work well for me in my organizing endeavors!
 Click here to read the rest of the post! =)


Thursday, January 24, 2013

DIY Quilted Placemats

Just before Christmas I was asked to try a new project...making placemats! The same friend who ordered this tote {which I love} asked me to use that same fabric to make her some quilted placemats. She is planning on converting her kitchen to a rooster theme, and I am so excited to see the end result!

DIY Quilted Placemats


I had never made placemats before...but after doing some research and looking at some placemats we had around, I figured out my plan of attack. Really it was quite simple!

I started out by cutting the rectangles of fabric that I needed. I pretty much just guessed on a good size, after looking at the size of some other placemats. I honestly don’t remember for sure what size I ended up with, but it might have been 17x12”?? I have so many measurements written on my white board from things I’ve worked on recently that I don’t remember, haha.

cut out rectangle


I cut out quilt batting the same size for each placemat. You need two rectangles of fabric and one of batting per placemat.

Iron the fabric good, and pin these layers together. Niiiice and flat.

pin batting between layers


I used a yard stick and chalk to make a nice straight quilting line across the center of the placemat. I have a little quilting bar on my sewing machine that helps me make the rest of the lines straight, but the first one I do this way.

make quilting lines


I love using chalk, it just wears off by itself, normally by the time the finished product is complete.

nice straight quilting line


I make my quilting lines two inches apart, but do whatever you think looks best. I also decided to just make the lines going one direction, instead of criss-crossed lines. I find that the more quilting lines you have, the more chances of things getting wonky and misshapen, and I really wanted to end up with a nice flat rectangle in the end. Haha. (I do the criss-crossed quilting lines on my tote bags, if you need an example of what I mean by that.)

two inches apart


I decided to get a little fancy (ha!) and cut off the corners of the rectangle so it wouldn’t end up being just a normal rectangle. I just used my cutting mat to give me even cuts on all the corners.

cutting mat

See how the cutting mat has a nice 45 degree corner already printed for me?? Its a good thing, because I am horrible at figuring out things like that! I just set the corner of the placemat in that printed corner, and cut!

cut off corners


Note: if you try this, resist the urge to play with the cute pile of corners. {wink!}

pile of corners


Next I just stitched all the way around the edge of the placemat to hold everything in place. These things are starting to look like the real deal!

stitch around edge


I made my own binding tape-esque stuff for the edge by cutting even strips of the fabric, then pressing the edges in {so there would be no raw edges} and then pressing that in half. I painstakingly pinned that around the edges and sewed it all together.

Let me tell you, this was the tricky part. I kept having to rip sections out and re-sew them to make sure that both sides of my “tape” were catching evenly in the stitching. I also wasn’t 100% pleased with how some of the corners turned out, but at least I don’t have to look at them every day. {wink!} #horriblethingforaseamstresstosay

finished edges


I was happy with how they turned out, overall!

finished placemats


close up of finished product


So there is one of my newest endeavors! Let me know if you try this out! Have you ever made placemats, or anything else for your kitchen? I'd love to hear about it!


Wednesday, January 23, 2013

Home Improvement: DIY Homemakers Edition {New Blog Party!!}

You all know that I love a good organizing, rearranging, or DIY project. Last year I set out to do one DIY project and one Pinterest-inspired project per month. It was a lot of fun, and while I missed a few months, I’d say it averaged out the way it was supposed to. This year, I decided it would be fun to have a little bit of a monthly CHALLENGE!

Home Improvement banner


The challenge is just what that says, a Homemakers version of a Home Improvement! The idea is to make any improvement to your home, blog about it, and come back to share it next Wednesday, January 30th. The improvement can be anything that, well, improves your home - organizing a space, changing out some decor, making a new recipe, having a cooking session, or even a homemaking-related topic like couponing or child-rearing. You get the picture. Basically anything goes!

Come back next Wednesday, January 30th to link up your project (feel free to link up any related project from this month!). Or if you don’t have a blog, we’d love to hear the details of your project in the comments section. Anyone can participate!

I can’t wait to see what projects you’ve been working on!

Grab this button to share this party with your friends:

home improvement button
Grab this button