


New here? I'm glad you are visiting! You may want to follow this blog so you don't miss miss a post!


It is ok, I totally meant to do it! =) Sometimes jeans need to be shortened to fit the person wearing them, but if they have a decorative hem you don't want to lose that either!
The hem you need is called a Euro hem, which allows you to use the original hem. Today I'm teaching you how to do it!
{And yes, the first time I did this it was on $100 jeans...yikes! You might want to start on a cheaper pair - although mine turned out fine. Phew!}
Start by measuring exactly how much you need taken of the bottom - where you want the new hem to be.

For these, I needed to take off 4 1/2 inches. Measure and mark that on the jeans.

You are going to cut right at that four-and-a-half mark. That seems wrong, I know, but trust me!


Remember you need to keep the actual hem intact, so don't cut through that! You can trim off any extra fabric, however...you only need about this much, enough to sew it back on.
Now measure how wide the actual hem is.

This one is 5/8". You aren't going to sew right up against the hem, though....I find it lays better if you sew your seam a smidgen bigger. So measure exactly where your seam is going to be. This one is 3/4".

Now go back to your pant leg. This part may sound kind of weird, but trust me...you'll see how this works as you do it.
Measure up 3/4" {or whatever your determined hem width is} from the cut edge of the pant leg. This is going to be the line you will sew on. You won't be able to see this line, though, so measure up another 3/4" so you can line things up. Remember, just trust me on this!

Then, with right sides together, line up your hem with that top line.

Then sew the predetermined 3/4" from the bottom of the hem. See how the hem covers up the line you need to sew on? That is why the second line is necessary to keep things in place.

Now your pant will look like this on the inside. There is still some extra fabric here!

So I serge the edge and trim that all off. This really needs to be finished off in some way, otherwise they will fray and come apart eventually.

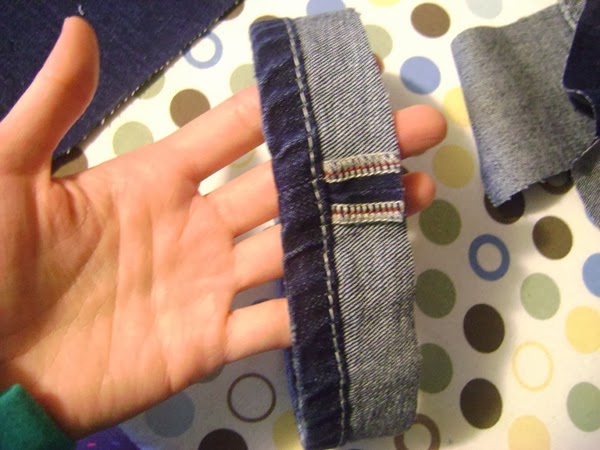
And it is done! Here is the right side...

The hem is obvious in this picture, but after being washed and ironed, the fabric will relax into place. No one will ever know!

Out of all the hems and seams we've talked about, this one is probably the most intense...but still totally doable! You will be glad you tried it!
Challenge: Has anyone done this euro hem before? Are you willing to try it? Let me know!
Other posts in this series:
Day 4: Purchasing Notions
Day 5: Helpful Links for beginners
Day 6: Free Art Download (on Discipline)
Day 7: Purchasing Fabric
Day 8: Fabric Prep
Day 9: Studio tour and work spaces
Day 10: Making a straight seam
Day 11: Seam ripping
Day 12: Online fabric stores
Day 13: Free Art Download {on Beauty}
Day 14: Buying a pattern
Day 15: Using a pattern
Day 16: Who needs a pattern?
Day 17: On Having Patience
Day 18: Turning things Right Side Out
Day 19: Helpful links
Day 20: Free Download {a colourful print}
Day 21: My Serger
Day 22: A Simple Hem
Day 23: A French Seam
Day 24: A Blind Hem

No comments:
Post a Comment
I appreciate you taking the time to comment! Some comments may need to be moderated, so don't be alarmed if your comment doesn't pop up right away. I can't wait to hear from you!