Showing posts with label Sewing. Show all posts

Tuesday, May 27, 2014

Shop Update: Large Canvas Beach Tote!

I am always excited when I can share a brand new shop item with you, and this time is no exception!

Introducing: the first canvas tote from So Sew Organized!


This is the largest tote I've ever offered!


Details:
Pink, White and Gray Geometric Design
Finished size: 13"x18"
Handles: 14" hang
7 inner pockets - three that are 7" deep, three that are 5" deep, and one pen slot
6" wide square bottom
Pretty gray bow! :)


This tote also has more and bigger pockets than any tote I've offered, too! See that slot for a pen? So handy!


I have used this tote practically every weekend for the last month or so. It can easily fit a couple changes of clothes, shoes, and all the toiletries that I need for a weekend away. It would be great for the beach or pool, too!


This is the item you need to organize your summer activities and weekends away! Why not pick up a couple now? You are going to need at least one, and your friends would love one as a gift. :)


Do you generally use a tote for summer outings? What other items help you organize your activities?


Wednesday, April 16, 2014

Re-Upholstering a Large Armchair

Over the winter my aunt enlisted my help for a pretty big, new-to-both-of-us project: re-upholstering her large, well-loved chair!


I had read several tutorials about re-upholstery, and I brushed up on what I'd heard before starting this project. Every chair is so different, however, so there was no guarantee that our "after" was going to work. Yikes! We really didn't know what we would find once we started pulling things apart, but there is only one way to find out, right? :)

Here is the almost before picture: As you can see I had started pulling the fabric off the back, and the cushions are gone. The arms, however, show you how badly this chair needed some TLC!


I'm going to walk you through our process, and share some tips we learned along the way. Just remember, no two chairs are created equal, and our methods may not work in every circumstance.

We started on the bottom of the chair. The very bottom was covered with a black interfacing (similar to this from Joann Fabrics) that we assume was to keep dust out. After pulling that off, we had to pull out the chair legs.

Black interfacing at the bottom of this pict, and the brown thing to the right is the chair leg
The legs were just plastic and wedged into a hole, so we pried them out with a screwdriver. We tried to avoid taking them out, but in some corners the fabric was underneath, so out they came.

Next we started taking off the fabric, starting with the back panel. (You can see I had it started in the picture above.) And now its time for the first, and possibly most important, tip of this project:

It has to go back on the same way it came off.

This means that the first piece I took off (this back panel) was the last piece to go back on. It also means that we used the exact method from the original chair to attach the new pieces. If they were originally stapled on, we stapled them. If there was tack strip, we used tack strip. If they had cardboard strips, we used cardboard strips. So it is incredibly important to take careful note of every step and label everything like crazy.

To label the pieces, I just wrote on the back of each one with a Sharpie. I wrote where it came from on the chair (right arm, seat, etc.) and which side was the top. Trust me, once they get laid out flat you CAN NOT tell which way is up!! I would also list where there was tack strip or cardboard strip. Can you tell I don't trust my memory?

I also took pictures of every step of the process to refer back to if need be.

Here is that first back piece coming off...see the tack strip?


We saved the tack strip and just used it on the new pieces, since there was nothing wrong with it.

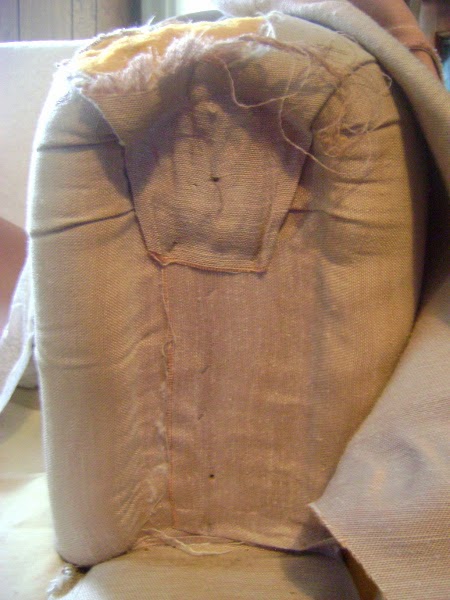
Here is another tip: Take careful pictures of the details.


This was the back of the chair at the top of the arms. It was important to remember how this looked, since I wanted my finished product to look just as professional!

Here is the front of the arms. They had a wooden piece that just popped off to reveal this:


And the back of those wooden pieces:


We put these back together just the same way, only with new fabric of course. :) We used those same cardboard squares and nails after stapling on the new fabric, and then just pounded the whole piece on to the arms. But that is getting a little ahead of myself.

We also uncovered a little-known upholstering secret: interfacing.


We found several places where a very heavy duty interfacing was sewed on to the edges of the old fabric. This was used to staple to the wooden frame, so instead of the pressure of the staple being on the fabric, it was on this interfacing. And let me tell you, this stuff was tough! I couldn't even begin to stretch it, let alone rip it. I couldn't find a similar item at the fabric store, so I just reused the old pieces. It meant some quality time with my seam ripper, but it wasn't a hard project.

Besides the tack strip and the interfacing, there were other original pieces that we re-used to cut costs. Most of these innards were still in great shape!

One piece was this interesting cord in the arms. It was sewed into a seam in the middle of the arm, and then stapled at the bottom of both sides of the arm. This created a little "pucker" or gather on the top of the arm, and as far as I know is completely a cosmetic detail. (You'll be able to see the "pucker" in the finished pictures)


We also kept all the original padding, including the seat cushion. We did have to buy new padding for the pillow.


We worked together for about 4 hours to get everything stripped down to this:


The reason it took so much time was the insane amount of staples!! There were hundreds of them, and they didn't like to give up the fight. We used pliers, screwdrivers, and hammers to get them out. Just when we thought we were almost done, we found another round of staples. No rest for the weary!

It all paid off in the end. I'll just skip to that part.


I didn't take pictures of the actually upholstering part, since it was basically just dis-assembly in reverse. :) I pinned all the original fabric pieces to the new fabric and cut them out, attached the interfacing pieces, sewed up any seams, and put things back together in reverse order from when they came off.

detail on the arms - those are the wooden pieces I talked about earlier
I used duck cloth (this stuff from Joann's in "olive") for the seat. It is a very heavy-duty piece of fabric that should hold up better than the original, which was ripped.


Here is that "pucker" I talked about.


As for the fabric we used, we ordered some home decor fabric from Joann's. (I don't know the name, but I think it might be this) We got 6 yards, and used every bit, with only small pieces left to spare. No room for error, which was nerve-wracking! It was just enough. Thankful everything came out ok the first time! The fabric is beautiful, and seems like a high-quality fabric that should last for the long haul. Lots of cousin bonding, movie watching, and book reading will be happening in this chair for years to come!

Update: my aunt explained to me how she came up with the 6 yard amount before ordering the fabric. She took basic measurements of the pieces, and then used graph paper to sketch out approximately how much we would need. She sketched it so one square = 6." Then she added some extra length for good measure. Hope that makes sense!
The pictures read as a grey, but really this chair is a pretty sage color!

I am so glad to have this project done and be able to say I've dabbled in the world of upholstery! Have you ever tackled a project like this? Please share, and let me know any tips or tricks you have! Feel free to ask questions, I'd love to help you with your project!


Linked up at the Weekend Wind-Down, Link Party Palooza, Show and Tell Friday

Wednesday, March 26, 2014

Tips for Working with Burlap

It has been a few weeks since I posted the first burlap totes in my Etsy shop. Burlap is so "in" right now, and so pretty in just about any decor!! The "teaser" pictures that I shared on our Facebook page got a LOT of comments and interactions, so judging from the response, you gals love burlap, too!


But working with burlap is SO WAY different than any medium I have ever used before. My prep time for these totes is about double what it is for a quilted tote. It is fun to see the natural burlap fibers bend in submission to my machine needle and become a beautiful tote. Definitely worth the extra work!

I read a bunch of posts about working with burlap before I started, and here are the tips that seem to work for me.

To start with, I have used two types of burlap so far:

Natural burlap, which is tan in colour and usually has a unique smell. Did you know that burlap in this state is compost-able? You can add your scraps to your compost pile and they will break down over time like any natural fiber. Burlap makes a great option if you want a "green" product.


White burlap. This does not have as strong a smell and seems to be treated in some way (or dyed) to be made white. There are lots of different colours of burlap availabe these days (I've seen red, green, and blue, as well as chevron patterns and text prints, so anything is possible!) but these are all treated and not natural, which means you shouldn't put them in your compost pile.


Here is the process I put the burlap through before I can use it to make a tote:

When I first purchase the burlap, I make sure it doesn't come into contact with any other fabric. The reason is that initially, the burlap "sheds" like crazy! I keep it wrapped in plastic to contain the fibers.

Step numero uno is to throw it in the washing machine. I wash a couple yards at a time and can put the white and natural burlap together in the washer without incident. I normally put a splash of detergent in as well.

To me, it seems like the burlap is just going to disintegrate if I wash it! But the fibers are actually really sturdy and tough. Consider this: burlap sacks are filled with 50lbs of beans or grains on a daily basis. If they can hold that much weight, they can probably withstand the washing machine! :) Some people wash their pieces 2 or 3 times to soften them up even more.

When the pieces come out of the washer, they are covered in fuzz from the fibers. I have found that most of those fibers don't collect in the washing machine, they stay tangled up in the burlap pieces, so there is no danger of getting your machine dirty or seeing those fibers on the next load of laundry.

I hang the pieces of burlap over a clothes hanger to dry. By keeping it nice and straight on the hanger, it dries straight. Normally when I purchase the burlap, it comes off the bolt crooked. By washing it and hanging it up to dry, it straightens out on its own.


Now how do I get all that fuzz off?

At first, I tried taking it outside while it was still wet and giving it a good snap. This might work...but not in freezing temperatures. Imagine my surprise when it instantly froze! Good 'ol Maine weather for ya! :)

Instead, I vacuum it off after it has dried. Yes, I vacuum it. Then I use a lint roller to get even more fine fuzz off every side. It takes several sheets of the lint roller, but this really works well!

During the process of putting a tote together, there is some shedding. I just use a damp rag to wipe down my work space before switching to a different project with cotton fabric.

Once I've made a burlap tote, there is very minimal shedding. I've been using this tote as a Bible bag for weeks, and so far no shedding! I am always wearing a wool coat, and even that doesn't pick up any white fuzz, so I call this method a success. Yay for successes!!

I'd love to hear if you have worked with burlap before, and what steps you take to prep your burlap for crafts. Will you try these tips I've shared? Let me know how they work!

I consulted several other blogs before working with burlap...here are some links I found helpful:
Notes From The Patch
Starshine Salon
Crafting a Green World
Southern Abbey
Stone Gable


I linked up with the Link Party Palooza, The DIY Dreamer and Weekend Wind-Down Party

Thursday, February 20, 2014

From the Needle of So Sew Organized

In the past couple months since Christmas, I've had several opportunities to fill custom orders through my shop. I always enjoy filling custom orders, since it forces me to think outside my normal box and try new pairings and ideas. Sometimes I like a customer's idea so well I end up incorporating it into a product for So Sew Organized.

Here are pictures of a few new things I've tried recently...

I had never used pink camo before...I like it better than I thought I would! The back of the apron is the black curly print.

This is the largest tote I have ever made - 18x18." It came out good, although I think something could have been different with the handles. Longer? Chunkier? Not sure...next time I'll try something else and see if I can hit that perfect combo.

This customer also requested another pocket inside large enough for a water bottle. I boxed the bottom of it so a water bottle would sit inside snugly. I liked how it turned out!


The aprons have been popular so far this year...here is a recent one I did, custom ordered for an elementary teacher.


So. fun! I have to show you a close up of the ABC fabric....I love it! Hopefully the recipient does, too. :)

This computer sleeve was a custom order. I was given the measurements of the computer and created a pretty sleeve to protect it, just like the other tablet sleeves in my shop. After I finished, the customer had it monogrammed...I absolutely love how it turned out! I don't mind saying that monogramming is one of my future dreams for So Sew Organized!


In other So Sew Organized news....

I have finally, finally listed the burlap items that I've been teasing you with on Facebook. I plan to share more details soon...but you can catch a sneak peek here, and go check them out in my shop!


So I'd love to hear...if YOU could put together a custom order from So Sew Organized, what will it be? Go ahead and share...with no obligation, of course! I'd love to hear your ideas and perhaps incorporate them into a product in the future!


Tuesday, February 18, 2014

Replacing A Coat Zipper

Recently I was asked to replace a few broken coat zippers, and I snapped a few pictures to share the process with you! I only documented this one method - I wish I had taken pictures of all three, because each one was a little bit different!

This one was a lined winter coat, but only one zipper needed replacing...the main one on the outer jacket.


Here is the broken zipper...

Here is an inside shot. There is a second zipper to attach the lining of the coat, but that one didn't need replacing.

Normally when replacing a zipper, I would take apart the seam holding in the old zipper and put in the new one exactly as the old one was. This one caused a problem, however. In order to take out the old zipper, I would have had to rip out...

That would have been a lot of ripping and I was nervous about getting it all back on correctly. Not to mention a whole second zipper to sew back on in the correct spot. So, I totally cheated.

I started by cutting off the teeth of the old, broken zipper.

This left me with a small strip of the old zipper left in the seam to secure the new zipper to.

I sewed the new zipper on with right sides together. The zipper will seem backwards, like the teeth are facing the wrong direction, but we aren't done yet. :)

The purple is the new zipper...the teal is the old one.

Here is the new zipper sewed on initially...see how the teeth are backwards? Let's fix that!

The last step is to turn the wrong end of the zipper in towards the inside of the coat and sew. I just followed the original stitching.


Repeat with the other side of the zipper.

This method does leave a small strip of the old zipper visible. It wouldn't be at all noticeable if the old and new zippers were the same colour. I was unable to find a new one the same shade of teal, which is why I went with the purple instead. However, with the colour blocking on this coat I think it looks fine! It almost looks like a bit of piping next to the zipper.

Here is the inside with the new zipper.

One trick of mine when putting in a new zipper is to save any type of zipper pull from the old one and attach it to the new one. This makes the zipper look original to the coat.

That is all...super easy! Now there is no reason not to tackle those broken zippers in your pile of mending. :) If I can help you with a specific project, let me know, I'd be glad to give answers if I can!

Also, I purchased these zippers from ZipperStop on Etsy. Not the shop I normally use, but they had the most options for puchasing separating zippers at the exact sizes I needed for these coats. They were easy to work with and actually sent me a free zipper when the first one wasn't exactly the right colour. I am a satisfied customer of ZipperStop!

What mending project seems like a daunting task to you? Have you ever put in a replacement zipper? How did it go?


Linked up with the Weekend Wind-Down party