Showing posts with label 5 Fat Files. Show all posts

Friday, July 4, 2014

Weekend Wind-Down #26

Welcome to the Weekend Wind-Down link party! I can't wait to see what you all link up this week! :)


I'm so thrilled to be able to bring you this party each week along with 5 other fun bloggers. We're excited to get your posts out there and see what you have to share with us! I love visiting links, and sharing them on Pinterest and Twitter. Remember, I only share and feature blogs that link back to us, so don't forget that important step! To start this party we've picked 6 unique features from last weeks party. These are posts that especially caught our eye and, of course, linked back to us. Is one of them yours?

DIY Ladder Shelf via Making It in the Mountains
Vintage Chocolate Coke via The Casual Craftlete
10+ Patriotic Recipes and Crafts via The Organized Dream
Chicken Nuggets via Mrs. U Makes

If you've been featured, congratulations! Feel free to grab this button and display it proudly! =) {just right click and save to your computer, then upload to your blog}


Ready to get this week's party started? Me too!

Here are the super simple rules to make this a fun party zone:


Here are the hosts...follow each one on the social media platform of your choice!


This Simple Home

Blog/Facebook/Twitter

/Pinterest/Google+  


De Divah Deals

Blog/Facebook/Twitter/Pinterest

/Google+/LinkedIn/Instagram 


Snippets of Inspiration

Blog/Facebook/Twitter

/Pinterest/Google+ 


A Living Sacrifice

Blog/Facebook/Pinterest

/Etsy/LinkedIn 

Mustard Seed Mommy

Blog/Facebook/Twitter

/Pinterest/Google+/Instagram


Moms Who Save

Blog/Facebook/Twitter

/Pinterest/Google+/Instagram


Have fun, and be sure to visit some other links and meet some new people! I can't wait to see what YOU link up! =) I'll be Facebook sharing and pinning from these links, but only ones that link back to us...don't forget that important step!!


Tuesday, May 1, 2012

5 Fat Files: Project Recap


Well, how did you do?

We picked 5 topics, created files, and learned how to fill them. We found other ways to build virtual files, talked about the importance of this system, and also scored some great content for them! (here, here, here, here and here)

Me? I had a BLAST! This was my first time putting out a big challenge like this, and while it was a bit more work in the blogging arena, I loved every minute of it. I loved reading about what you were doing and what you had to say about certain subjects. I loved seeing your enthusiasm to learn new things. I thoroughly enjoyed interacting with you each day.

And most of all, I love my FILES!


Ok, love is a strong word when we are speaking of files folders, but you get my drift. :) It is so nice to have this system in place. When I want to remember something, it is as easy as clicking “pin it” or “print” or some other one-step method of saving it for later. I have already learned new things, and I can see myself utilizing this system to learn more in the near future! I think it is so important to continue to learn and exercise our minds - like any other part of our body, it needs exercise! Having this file system in place ensures that I can exercise efficiently...kind of like a workout plan for my brain, lol!

Here are my 5 folders again, and how I’m doing so far with each one:

Femininity: I already had several articles in my file folder on this topic, and I bookmarked a couple more this month.

Keeper At Home: I added several of this month’s guest posts to this folder (this one and this one) plus this folder already had some content. I also started a Pinterest board dedicated to this subject and a separate one with kiddo ideas.

Sewing tips: This Pinterest board already has some great content! I also found some things I had saved previously in my sewing desk, so I popped them in my folder instead. Gotta love having everything in one place!

Simple Living: I added this guest post to this folder, plus already had some content it in before. I also started this board.

Whole Foods Diet: This folder already had a small stack of content, plus I added this guest post. I also started a Pinterest board which right now has a whopping 1 pin on it. :) I am sure in no time this board will be bursting!

These sticky notes, stuck in the front of my folders, make a great place to jot down book titles, podcasts, or anything else I want to include in my file!

I also follow several blogs that fall into these categories, for the express purpose of learning from some individuals that have some great thoughts, experiences, and lessons to share. Here are a few of them:

Money Saving Mom - I save posts from here that fall under my “Keeper At Home” and “Simple Living” categories.

Life….Your Way - these posts often fall under “Keeper At Home.”

Passionate Homemaking - falls under “Keeper At Home.”

Heavenly Homemakers - falls under “Whole Foods Diet.”

That is my recap of this project in a nutshell! I would love to hear your thoughts concerning this project (even if you weren’t able to participate, that is ok too!) and hear an update on your files!

If you weren’t able to join us this month, it is never to late to set up your 5 folders and start your own files! Just go back to this post to get started! You’ll be glad you did!


Thanks for joining our 5 Fat Files Project!


Friday, April 27, 2012

Guest Post: Our Adoption Jouney


I can not even begin to tell you how thrilled I am to be introducing today's guest blogger.

Ever since meeting this family 3 years ago, I have become increasingly interested in adoption and the difference it makes in the lives of so many children. I have since talked to others that have adopted children and read blogs about the hope that is being given to so many children because of the opportunity to adopt. So when I was contemplating and praying about who to have as guest bloggers for this month, I knew Denise had to be one of them! I am so thrilled to read a brief recap of her personal story, and I know you will be personally blessed by it.


My desire to adopt started during the Vietnam War.  I would watch the news and feel so sad for all the children who had lost their parents in the war.  In 1975, I believe, President Ford had a campaign of sorts called Operation Babylift which was an effort to bring Vietnamese orphans to the States to find them adoptive families.  I  was only nine years old at that time and my mother, my brother and I were Catholic.  I can't say I had a spiritual burden for the children, just a compassionate heart.  I wondered why those children were in a war-torn country and had lost their parents while I was safe in America with my family and my home.  Around that time, the year was 1973, the state of Ohio started the children's protective/foster care division of family services.  And....I begged my parents to become foster parents!  (I must have been so annoying!)  My mom finally broke down and called the mother of one of my classmates who was a foster parent.  Apparently she asked a few questions and let me know that she didn't feel any more led to be a foster parent than she did to be an adoptive parent- my brother and I were her personal limit and she DID NOT want more children- especially through adoption!

Fast forward eleven years- Denise meets Ken!  A match made in heaven- for sure.  I was so thrilled to find out that Ken's older brother was adopted!  So, we were both open to adoption. After being saved at seventeen years old, my interest in adoption became a spiritual burden.  I wanted to see children who were born into bad or godless situations have an opportunity to know my Lord.  As a young girl, I believed I would be unable to have biological children because I had such a love and passion for adoption.  I also believed if I did have children I would have one who was mentally challenged or disabled because I've always especially loved to work with children and adults who are delayed or disabled mentally.  Well, our first child was born just sixteen months after our wedding.  After having four children in six years we were pretty sure my concern about not being able to have biological children was unfounded!  However, the desire to adopt never left us.  When our youngest biological child was about six or eight years old, we began to pursue adoption.  We did not really have a number of children, gender preference, or national versus international preference.  We did hope, at first, to adopt either an infant or very young child(ren).  We did start out trying to adopt internationally.  We changed course for a number of reasons- too many to list them all.  Basically, we felt it was cost prohibitive and since we were "older" with four children already, we were disallowed in some countries. 

Eventually, we began to look at the foster care system in our state.  We had several friends and acquaintances who had or were currently foster parents.  They were Christians and seemed to do fine with it, so we took a closer look.  Our local agency's training schedule was not compatible with our family's schedule, so we looked into a private foster care agency about 40 minutes away in a different county. We became therapeutic parents after participating in about forty-eight hours of training.  During this time, we became open to older children and sibling sets or groups because they can be harder to place.  We were also open to mental delays- which goes back to my early years of loving to work with delayed children. Because we were licensed (by choice) foster to adopt, we were able to have "first dibs" on any foster child in our care who became available for adoption.  It really is a neat program, but that's not how we met our first adopted children. 

We got a call one day, after we were licensed to adopt.  It was from one of our friend/acquaintances who was a foster parent.  This is a neat family we knew in Ohio who had parents (in their 60's) and several of their adult children who were foster and/or adoptive parents.  This call was regarding three little girls who were being fostered by a member of this family.  They were coming to the end of their time in foster care and were going to be placed for adoption.  This family had a lot of pull with their local agency and said if we wanted the girls, they would work to see that we were able to adopt them.  So, about five months later, after several weekend visits and one week-long visit, they moved into our home on a foster-to-adopt agreement between the agency and us.  In Ohio, children have to live in the home for six months before a family is allowed to adopt them.  So, we did adopt them six months after they came to live with us. During this time, we switched from the therapeutic agency to the local agency that had custody of the girls.  It was amazing to us that these little girls, ages four, five, and seven when they came to live with us, were raised in America and did not know Who Jesus was or that Christmas had something to do with Him!  It was sad and I still find that amazing.  One of the reasons I was pulled toward international adoption was that I felt THOSE POOR KIDS NEED TO KNOW ABOUT THE LORD!  I really did not realize how spiritually empty some American children are, too.  The very day our adoption on the first three girls was finalized. our second set of siblings came in foster care for the last time.  They had had a very rough beginning.  It's a truly heart-wrenching story and when I heard it my heart just ached for them.  These two little people- ages one and three at the time were offered to our friends as a possible foster to adopt placement.  The wife called me that day to congratulate us on our adoption and also to ask us to pray about these two little ones they were considering.  A few days later we spoke again and she really hadn't made a decision- she was so focused on the challenges.  I told her if it were us, we would take them, but we'd continue to pray for their decision.  We found out they had decided against the  children joining their family and we immediately told our agency we would be interested in adopting the children.  In our hearts, we knew they were our children.  However, Ohio law and agency regulations do not allow another adoption so close to one that had just finalized.  So we waited, and sure enough, eventually, they asked us to adopt the children, which we did.

Each of our adoption stories has its own amazing miraculous details- the kinds of things only God can do.  Even our caseworker (she worked all five of our adoptions), once told us, I was sharing your story with a friend who is also a caseworker and we are just amazed at how things have fallen into  place with these adoptions.  She said "I believe I have actually seen God work".  She went on in great detail about things that "just don't happen....you don't understand, I've done this work for years, and these things JUST DON'T HAPPEN"!  We understand, we serve a great God!

Adoption is not without its challenges, for sure.  I don't want to be misleading.  It is a tremendous blessing, though, to those who are touched by it.  To us, it is the greatest earthly picture of the spiritual truth of salvation- being made a joint heir with Christ through the adoption of sons.  We were without hope and the Lord made us His own children.  I will never get over that.  I was so unworthy, yet He took on Himself my sins and gave me His righteousness and now I have a home in heaven with Him.

Foster care adoption is definitely worth looking into for anyone who is interested in adoption.  As Christians, we are so against abortion.  We always say, someone would want that child.  Maybe that someone is me or you!  We have a social worker friend in the state of South Carolina who told me if one family from every church in SC would adopt a child from South Carolina's foster care system, it would shut down the whole system!  The little people in care need a family, but most importantly, they need the Lord.  It's a full time ministry opportunity.  It has its challenges and its rewards.  My kids have brought out the good, the bad, and the ugly in me!  It keeps me on my knees and I am so thankful for the opportunity to be "Mom" to five little people I didn't give birth to!  (Ephesians 1:1-14)

James 1:27- Pure religion and undefiled before God and the Father is this, To visit the fatherless and widows in their affliction, and to keep himself unspotted from the world. 

Denise is mommy to 9 children: 4 biological and 5 adopted, with her first grandchild is the way! She and her husband live in the beautiful state of North Carolina where they are striving to raise their children to love and serve God.

Did I not tell you that you would be blessed? Certainly the Lord has been at work in their lives every step of the way. I feel so privileged to know this family and see first hand what God is doing in their lives!

You can download a printable version of this post by clicking here. 

Perhaps someone reading this today feels led to pursue the adoption or foster care system. What are your thoughts concerning adoption? Any questions for Denise? Feel free to leave them in the comments section!


Thursday, April 19, 2012

Guest Post: The Deal Scoop


 As part of this month's challenge I have recruited the help of a few guest bloggers to share some new information for us to learn about. Today's guest touches on a subject that many people today are concerned about... saving money.

I enjoyed delving into the world of couponing and deal shopping when I lived in the Sates, and have done some research on this subject before. (Go here, here and here to read about my system and thoughts in the subject) I am so thankful to have this post to add to my files as well! Take it away!


I have always been frugal,  and I enjoy finding the best deals possible on whatever it is that I need to buy.  I got seriously into couponing and deal hunting back in 2008.  I was browsing the web trying to find the best price on a Christmas present for my husband when  I stumbled across a forum where people were talking about all the free stuff they were getting with coupons.  I had heard of people using coupons to get free stuff, but I never believed it was really true.  I thought it was just TV sensationalism.  I was intrigued to see that people were discussing not only what they were getting free, but how they were getting it.  I began to read…and read and read and read.  I honed in on figuring out how to work the deals at one store, and I did not attempt a shopping trip until I was quite sure I had mastered the concepts behind their reward system.

Finally the day came when I ventured into my local CVS, coupons in hand.  Everything I planned to get was in stock, and I came out of the store approximately 5 minutes later, having spent $0 in cash and actually earning $30!  Needless to say I was hooked!  I proceeded to visit 3 more CVS stores the same day, and I came home with a van full of products, and I still had $30 to spend the next week.

I had proven to myself that couponing really works, and I began researching how to use coupons at the grocery store.  Then I proceeded to learn how the rewards systems work at the other drugstores in my town.  As I read and researched these things online, I became aware of a whole network of couponing and deal blogs.  They dredged up in-store deals, online coupon codes, free samples, money-making opportunities, etc. and posted them multiple times a day on their blogs.  It seemed the number of deals one could snatch up both online and in the stores was unlimited!  I ended up starting my own blog to share my finds with family and friends.

Before long, however, I was shopping at so many stores and getting so many deals that deal hunting actually became a burden rather than a blessing.  I have had to find the right balance between using the deals to my family’s financial advantage and being downright ridiculous.  I have developed three simple rules to follow that have helped me to keep that balance.

  • Make sure the deals you are seeking out are relevant to your particular situation.  Maybe you’ve found that you can get 10 boxes of instant potatoes free with coupons, but your family doesn’t eat processed foods.  Don’t spend your time getting things just because they’re free.  Instead, determine what your own family’s needs are and research how to get the best deal possible on those things.
  • And with that in mind, my second rule is this: A little research goes a long way.
  1. Are you trying to eat whole foods?  Spend time talking to people in your area who have a similar style of eating and find out where they get the best deals.
  2. Are you needing to cut down on your toiletry expenses?  Research online how to “work the deals” at the drugstores.
  3. Do you have particular grocery stores at which you like to shop?  Find blogs with the best weekly deals at those stores.   
  4. Never buy anything without checking to see if you can get it at a better price.  Check store prices against online prices.  Check to make sure there are no coupons for the item you need to purchase.  Look at multiple stores because one of them is bound to have the item on sale.  Combine a sale with a coupon for an even better deal!
  5. When shopping online, always check for coupon codes or cash back sites to lower your price.  You can almost always chip a little bit off of your total that way.
  6. If you can wait a while before purchasing something, you may be able to find it on Craigslist, ebay, or at a yard sale.
  7. If you’re buying local food, could you barter goods or services of your own to bring down the actual cash payment you would have to make?
  • Finally, Deals are my last priority.  I guarantee you I will be doing my best to never pay more than I have to for something.  But there are times when it’s just not worth it. If I have to ignore my children and leave my house a mess in order to get a deal, that is one deal I’ll be passing up. Although I would love to get the best price on everything 100% of the time, my family is more important than any money I can save. 

 MaryEllen is a wife and mommy to three littles in the beautiful state of North Carolina. She enjoys saving money, buying deals, living frugally, and helping others do the same! She blogs at The Deal Scoop, where she gives daily deals, free samples, and product reviews.


Thank you so much, MaryEllen, for sharing your thoughts with us! Click here to get a printable version of this post for your files (or save it in one of the ways we discussed yesterday!)

I love the practical solutions to saving money, such as simply waiting. I think you can never go wrong by waiting, researching the best options, both in price and quality, and getting the best deal that you can! By waiting, you may even find that you don't need it at all. Not spending is the best deal advice there is. :)

I also loved that MaryEllen mentioned that she puts her family and her "high calling" first. That is so important when you feel you are getting sucked into the couponing game!

What saving or couponing tips do you have?


Wednesday, April 18, 2012

5 Fat Files: The Other Files


I hope you are enjoying this challenge as much as I am! Seriously, it has been great to learn new things and develop a way to better save them for future use. I feel like I am being a better steward of my time by having this system in place...saves me from searching and researching for information I already have!

Today I’d like to branch out a little bit and talk about the other files you can build beside the virtual ones. Because really, in today’s day and age, who is going to limit themselves to some file folders? Not me!

This is a step in the challenge that you can pick and choose what works for you. If you want to just fill your literal files, go ahead! Or, find other ways to build virtual files to make this process even easier than it already is!

Here are just a few suggestions and ways to build other files:

::Pinterest:: obviously this has to be my first option. :) I have recently added new boards on Pinterest that match my 5 file topics. This is perhaps the easiest way to build files solely from internet content. I still do print off certain things, however...if it a series or something that can’t be exhausted in a single pin, or if it is something that really spoke to me that I want to be able to read again and again. If you aren’t on Pinterest and would like to be, let me know and I’ll send you an invite!

::Computer files:: here is what mine look like on my Mac:


Under “Documents” I created a folder called “5 Fat Files” (imagine that!) and inside that are 5 more folders for each of my topics.


To create a new folder, just click the button indicated by the red arrow. A drop-down menu will pop up, and the first option will be “create new folder.” Easy-peasy.

In these folders I can put web archives, pictures, or anything I type up online. You can also copy and paste content from a site in to a Word document and save it in these folders. Just be sure to include the url from the site so you don’t forget where you got it! I used to do this a lot before Pinterest made my life easier. :)

::Bookmarked Folders:: This is going to be different in whatever browser you use, but right now I use Firefox, and this is how it works:

Just right-click on the bookmarks bar at the top of the page. This menu will pop up:


Click on new folder. Now this window will come up:


Type in the name for your bookmark and click "add." Do this for any folders you want to create.

Then your folders will be nicely displayed at the top of your browser window:


To add a web page to the folder, just click on the url and drag it down to the folder and drop it in. I do this a lot, too!

::Email folders:: Again, this will look different depending on what email provider you have, but if you are smart use Gmail, this is what it looks like:

In the right sidebar of your gmail is a list of all the folders you have. Actually, they are called "labels" but basically they are folders that your emails can be sorted into. Click on "create new label" at the bottom...

Enter your new lables name. I called mine....wait for it....5 Fat Files.


Once you create that label, go back and create the ones for your actual files, nesting them under the main label of 5 Fat File.


Having these 5 email folders will be a big help if you subscribe to any websites having to do with your files and receive regular email updates. If one of your files is on "couponing" or something similar, this type of folder is almost a must!

Those are the other folders I thought of. I use most of these regularly to keep things organized anyway, but adding those spots specifically for my 5 files is a must. The bonus is the nice, organized feeling you have when its all said and done. Pat yourself on the back! :)

Stay tuned in...tomorrow we'll hear from another guest blogger that I am sure you won't want to miss! (anyone want to save some moolah?)

For now, chime in with your thoughts about this project. How are you doing with your files? Which of these "other" files are you going to implement into your system? What other files can you think of that I missed?


Tuesday, April 17, 2012

Guest Post: A Few of my Favorite Herbs


As part of this month's challenge I have recruited the help of a few guest bloggers to share some new information for us to learn about. Today's guest has me at a hello with all of the info and life-changing facts!

Healthy living has been a subject of interest for me for a couple of years now. That is why I dedicated one of my 5 Fat Files to "Whole Foods Diet." This post reflects that this is also the heartbeat of the author, and I feel so privileged to be able to learn from her and glean from her wisdom! Without further ado, lets talk about herbs, shall we?


 Hi! My name is Lauren Lockhart and I’m a farm girl-at-heart who lives in the city and longs for the country! I grew up on an 85 acre farm among the rolling hills of Middle Tennessee so farming and living minimalist is something I’m very familiar with! My husband and I are currently living in the foothills of the beautiful Blue Ridge Mountains of NC and have three children.  I love farming, animals (horses in particular) and herbs!

I remember my first introduction to herbs was my Mom’s herb garden that she planted every year. I remember the beautiful lavender flowers, the spicy smell of basil and oregano, and the sweet smell of sage. She used those herbs in sauces and such, but never grew any for medicinal purposes. I began researching herbs three years ago when I had a very bad car accident one week to the day of going through a miscarriage. The two did not mix well for my health and many debilitating issues arose from that combination. I visited Orthopedic Surgeons, sought Chiropractic Care especially tailored to my specific injuries, and even consulted with a Naturopath. Nothing helped.  Then, through Shoshanna Easling over at the Bulk Herb Store, I was introduced to Comfrey. Another name for Comfrey is Knit bone. Aha! Maybe this would help? It did! I was hooked!! I then began researching herbs for EVERYTHING! My favorite research aid for a good breakdown on any herb is the Bulkherbstore. Shoshanna never ceases to amaze me and her energy just spills over into everything that she does! Researching herbs can be very time consuming and you can get bogged down quick. Their research aid at the Bulkherbstore helps me to quickly locate the right herb for specific ailments quickly so that I can get a remedy made up quick! I love it! Once I’ve read Shoshanna’s info on the herb, I do more web searches to gain more information so that I’m making sure that I’m using the herb in the best way possible. One nice thing about herbs is this, unless the herb is noted for extreme poisonous effects upon the body, you can’t overdose someone by accident. :) That’s always nice to know! You can always sign up to receive weekly updates and tips from them and Shoshanna has bunches of YouTube videos on how to make everything from a simple smoothie to an incredible hairspray using those incredible little plants! Just go to youtube and type in “Bulkherbstore” in the search bar and her videos should come up!

Two years ago I began growing some herbs in my flower beds to see how they, and I, would do. :) I grew basil, oregano, comfrey, chocolate mint, peppermint, Echinacea, tansy, and Stevia. Everything was a complete success and I grew enough to put away for almost an entire year! This year my herb garden is going to be quite expansive as I will be growing certain herbs for medicinal purposes and some to keep unwanted pests from my garden and others to attract bugs, butterflies, and bees for proper plant pollination! My blueberry bushes have done so well since I planted Echinacea right by them. The butterflies and bees just love both sets of blossoms. :) Herbs are so easy to grow and if you’ve never done any sort of planting or growing of anything, start with herbs. :) You almost can’t kill them, well, unless you burn them I guess? :-)

I also have a favorite local resource that I like to use every year. Mr. Ron over at Plantwise Nursery in Spindale, NC has a diverse edible landscaping business that provides locals with edible plants, bushes, fruits, vegetables, and herbs that are native to our area. He is genius in this and I’ve learned so much from him! He teaches local classes, but I’ve learned so much more by just visiting him, picking his brain a bit, and then coming away with many new plants to try!

Some of my favorite herbs, roots, and dried berries that I use on a regular basis are comfrey, plantain, arrowroot, rose hips, pomengranate green tea, jasmine green tea, orange peel, licorice root, fennel, basil, oregano, chocolate mint, peppermint, Echinacea, tansy, stevia, cinnamon bark, diatomaceous earth, elderberry, blueberry, ginger root, red raspberry leaf, autumn olive berry, archangel …to name a few!

I love to make herbal teas, tinctures, salves, poultices, and astringents. All this I learned by getting Shoshanna’s DVD’s from the Bulkherbstore. I’ve also bought a book or two on recognizing edible plants in the wild and in your own backyard! I don’t have a specific title for this area. Really, any book on the subject will be informative, just make sure it has colored pictures! Sometimes the only difference from an edible wild plant or herb and a poisonous one is a variance in the color. You will be amazed to learn all the wonderful things that are all around you that you just don’t “see”!! The past two years I’ve discovered, now remember I live in the rural city, that I have Autumn Olive berry bushes that are super high in Lycopene growing all around my house, little purple archangel herbs growing in my yard, and several kinds of wild plantain! All of these are super charged herbs and plants that can be used for a variety of purposes.  I also discovered that elderberry grows in abundance here as well so while driving around town and in the country, I keep my eyes open for those beautiful bushes, mentally make a note of their location, and then come and harvest the berries when they are ripe! Elderberries are a must have when it comes to keeping everyone free of sickness! I use it with all my children and we’ve been flu free for 10 years. No one has had it, nor have any of had any respiratory infections, colds, or any other ailment to boot. Those little berries are potent!!

It all starts with a good resource and the Bulkherbstore is an excellent one! If you ever have a question about an herb, email them and they will get right back with you and will do their best to help you in any way that they can! To me, that is worth a thousand books!

Herbs are also a good family project! My kids love the mints and stevia that we grow. They call them their “chewing” gum. They simply pull off two leaves of chocolate mint, roll them around a pinch of stevia leaf (very very sweet plant) and chew away! We grow chocolate mint in hanging baskets on the porch and the minty smell just wafts over you every time you come and go from the house! Love it! My middle daughter helped me plant Chamomile this week and she checks every night to see if anything is growing yet. :)  Children will love what you love and we want them to love good and healthy things!

I am so happy to be able to be a part of this “Five Fat Files” and I’m going to be doing this myself! This is a really great way to get yourself motivated to learn and also to teach! Enjoy!


Please tell me that I am not the only one sitting here with my mouth gaping open (there may even be some saliva starting to form). I am awed by what a benefit and help to our bodies these little things called herbs can be! I really had no idea they were this important. I am so glad I chose to add this to my files, and excited to learn more as the days go on! Thank you again, Lauren, for sharing your wealth of information with us!

Click here to get a printable version of this post for your files. I for one have added this to my "Whole Foods Diet" file!

I hope that this post was a help to you! I'd love to hear how exactly you are going to use it to your advantage. If you have any questions for Lauren or would like more information, you can pop over to her blog, or leave a comment right here for her to answer.

We'd love to know - what was the most interesting part of this post for you? For me, it is reading how easy it is to grow these herbs right in your own yard. It is amazing to me how God has given us the ability and resources to care for our own bodies...without it costing almost anything! What especially stuck out to you?


Friday, April 13, 2012

5 Fat Files: How to make a blog button


As part of the month-long blogging challenge we have going on over here, I want to be able to provide you with some quality content to start filling your files with (like this great post from yesterday). I don’t want to rely solely on guest bloggers, so I’m going to throw some of my own content in here for ya..with a little tutorial!

I honestly can’t believe *I* am sitting here telling you how to make a blog button. Literally 3 short years ago I wouldn’t even have known what a blog button was. (I barely knew what a blog was then, lol!) But now I love making blog buttons and graphics, it is one of my favorite parts of having a blog! (And waaaay deep down inside, I think I have a little bit of a geeky vein running through me, haha!)

There are a lot of different programs and tutorials out there, but this is what works for me. I hope that it is a help to someone else!

I use Gimp, which is a free program, but kind of tricky to use. It just requires time and effort to learn the many many different aspects of it. I still have a looooong way to go (who knows? I might even be doing it all wrong) but I have learned enough so far to get me by. Here is the Nicole way to make a blog button using Gimp. (Please note that I have only ever used Gimp on a Mac computer, some things may look different on your PC.)

Once you open Gimp (that would be a good place to start, now wouldn’t it?) go to “File” and select “New”


This screen will pop up:


A normal blog button is 125x125 pixels, but feel free to make it any size you want. Once you’ve typed in those numbers, click “ok.” You now have a button.


But lets dress it up, shall we? That blank white box isn’t doing much for me.

Along with the window that your button is in, the “toolbox” window should be open. This has all the different “tools” we will use to make this button. It looks like this:


Start by clicking the paint can (indicated by the red arrow). This tool is going to fill our button with a color. Pick your color by clicking the black box (blue arrow). You also want to make sure that the “FG color fill” button is selected (green arrow).

When you click the black box, another window will pop up for you to select a color. I picked a nice teal (because teal is the new black, hadn’t you heard?) Select your color and click “ok.”


Now go click on the window that your button is in (to select that window) and hover your mouse over the button. Your mouse will appear as a little paint can. Click on the button, and it will fill with the color you picked!


Now lets add some text to our button. Go back to your “toolbox” window…


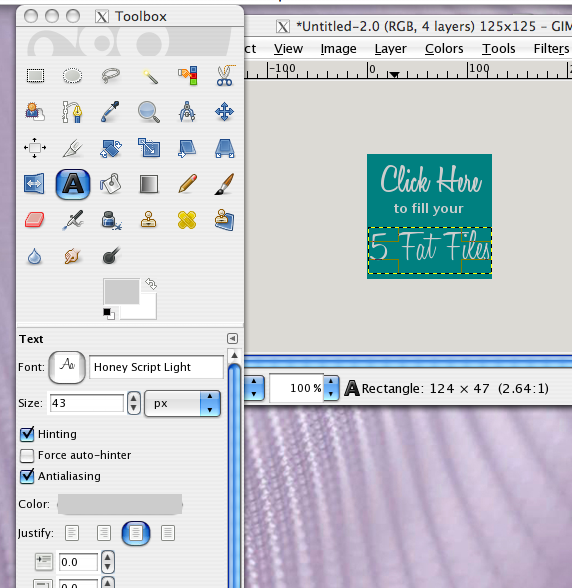
Click on the “A” (red arrow) to select the text tool. Next click on the font button (blue arrow) and select the font you want. (I am in love with this Honey Script right now!) Pick a color for your text (green arrow). (Anyone else feel like we are playing "red light, green light?")

Go back to your button window. Click on the button to create a “text box” and just start typing. Your text should appear as you type.


Go back to your “toolbox” window and change the size of the text (green light arrow). Just make it whatever size you want. And here is a little trick of mine: I make my text box the same width as my button, and then center the text (red arrow). That way I know the text is exactly centered. Tricky, aren’t I?


So far our button only says “Click Here.” That is because I want the different lines of text to be different fonts and sizes. I think that creates more visual interest and also makes it easier to read by breaking it up a little. I just do what looks “right” to me. So, here is the rest of the text process in pictures. I just kept repeating the last few steps to add text, make it the size and font I wanted, and centering it.


See? I changed the font.


When you are adding these text layers, there are most likely 3 other windows open. We haven’t needed them up to this point, but now I’d like to explain them:


When you are adding these text layers, there are most likely 3 other windows open. We haven’t needed them up to this point, but now I’d like to explain them:

1. Your text editor. This is where you can edit your text (shocker, I know) like if you spell a word wrong or something.
2. The layers window. Your background and each of your text boxes are all separate layers. More on that in a minute.
3. Your history, in case you want to go back and undo something.

The most important of these is number 2, the layers window. If I want to edit the “click here” text, I must have that layer selected. Otherwise I can’t do anything to it. Maybe I'm just nutso, but I have the hardest time remembering to select the layer I want!


So now that you know about the layers, you can get all the text boxes spaced just the way you want them by clicking the correct layer, and then moving the text box. (If you click on the text box you want, your mouse should come up as a directional arrow when you hover over that text.)


Now we have a basic button. Congratulations! You can stop right here and be good to go….or you can continue and dress your button up a little bit more.

Oh, you want to keep going? I was hoping you’d say that. :)

Lets add a background image to our button. Just go to “File” and then “Open.”


Select any image you want from a file on your computer. Let's use a star, even though it has nothing to do with the 5 Fat Files challenge. Because we can. It will open in a new window.


Go to "Edit," click "copy." This copies the image to your clipboard.


Now, this part you must keep straight. It has to do with layers. Listen very carefully.

Click on the window with your button, then click on the layers window. (If you click on the layers window without clicking on your button first, you'll add a new layer to the star instead of the button.) Once you are on the layers window, click the button indicated by the red arrow to add a new layer.


This window will pop up:


You can give your layer a name, if you want to be all fancy like that. Click "ok."

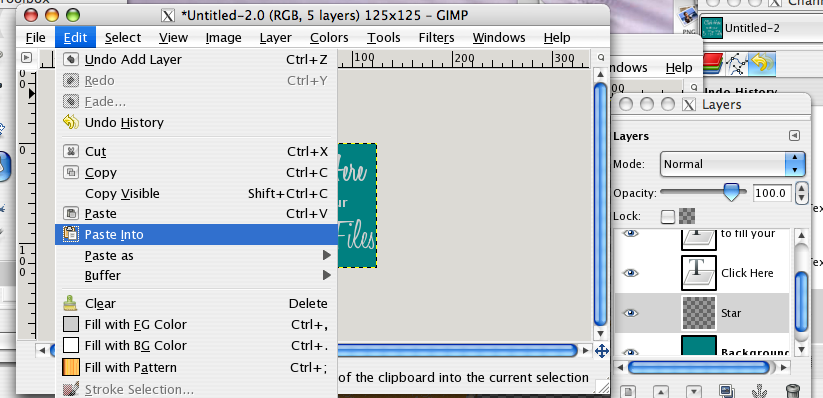
Make sure you select the new layer before going on! Go to "Edit" and click "Paste into." This will paste the star into the new layer (as long as you selected the new layer first!)


Our star is now pasted in, but it is not the right size.


Go to "Layer" and click "Scale Layer."


This window will pop up:


Decide how big you want your image and type that in. Since our button is 125x125 pixels, I went for a little bit smaller than that. Click "Scale."

 Once it scales down, you can click on it and drag it where you want it.


Go back to the layers window. You need to "anchor" this layer (I honestly don't know why!). Do that by clicking the anchor button indicated by the blue arrow.


Now make sure that your image is behind your text. (Unless of course, you want it to cover up your text. More power to ya.) Just use the up or down arrows at the bottom of the window to put it underneath your text, but above your background color.


We're just about done! Lets just add a simple border to our button.

Click on "Filters", then "Decor" then "Add Border."


This window will pop up:


Since a button is quite small, we just want a tiny border. I chose 3 pixels.  Click on the color box to select your color.

I, quite clearly, chose a brown to match the star.


Click ok, aaaaand, you're done!


Go to "File" to save your button. If you just click "Save" it will save it as a .xcf file, which simply means you can open it back up in Gimp and edit it more. To save it in a permanent format, click "Save As."


This window will pop up: (how many times have I said that in this post???)


Select where on your computer you want to save it. Type the name in the top, followed by a period, followed by the format you wish to save it as. I usually do .jpeg for a button.

Hit save. This window will pop up Then you'll see this:


Blah, blah, whatever. Just hit "Export."

Then your eyes will be feasting on this:


Just hit "Save." Not sure what all that means either.

And now you are really and totally done!


I know that was a long, long process (and about 42 screen shots - no lie) but once you know those basic things, it really goes a lot quicker. I've tweaked this to make most of the graphics for my site. It is so fun to learn how to do new things!

I honestly just play around with Gimp and click lots of buttons until I get results I want. If I'm not sure what a particular option will do, I just click it and find out. If I'm not sure how wide I want something (like the first time I put a border on something) I just shoot high and whittle it down to where I want it. I figure, I'll get it eventually, and if I don't, I'll ask someone! *CoughAndrewcough*

I hope that this is a help to someone, and that you enjoyed learning something new today! Have you ever tried Gimp? What photo editing software do you typically use? Did I miss any important steps in this process?

Psst! If you have any trouble making your own button, I'd be glad to help you out if I can! Just leave me a comment!