Showing posts with label Tutorial. Show all posts

Friday, August 22, 2014

My Experience with Facebook's Boosted Posts

If you have a fan page on Facebook, you know how completely frustrating and complicated it is to get your posts seen by your fans. Facebook makes it harder and harder to get your posts out there, so bloggers and business owners are getting more and more creative with their posts!

Over the past few months, I have experimented a little with Facebook's boosted, paid posts. Yes, I said paid. I know most bloggers choose not to do this, but I decided to give it a try!


Facebook's Business page says this about ads:

Ads on Facebook are unique. They're shown to specific groups of highly engaged people on desktop and mobile. When your ads have great creative content and are well targeted, they get more likes, comments and shares. When someone takes any of these actions, their friends may see your ad, making it more powerful. When you boost your Page posts or expand the audience for your ads, more people will see them when they visit Facebook.
We'll help you create ads that achieve real results, whether that means connecting with more people through your Page, finding the right customers for your app, or driving sales on your website or in your store.

Best For

Reaching more people
Targeting a specific audience
Brand Awareness
Generating sales

Because I am using ads to reach potential customers and - hopefully! - generate more sales, I figured it was worth a try. After all, you have to spend money to make money sometimes, right?!

I have tried boosting posts on 4 different occasions:

1. For our Ultimate Homemaking Bundle Facebook party

2. On the last day of the Ultimate Homemaking Bundle sale

3. When I released So Sew Organized's canvas totes for the first time

4. When I released these new tablet sleeves.

My first campaign, for our bundle Facebook party, was kind of a wasted effort in the end. I didn't realize that when you prepare an ad or boost a post on Facebook, it doesn't go into effect immediately. Facebook takes a few hours to determine your target audience and...I don't really know what else. I don't know why it takes so long to get up and running, but it does!

So I scheduled my ad to be posted at the start of our party - my idea was to encourage more people to join in! The post itself did reach my normal audience, but the paid, boosted audience did not get reached until well after the party was over. Bummer! 

When it was time to write the ad for the canvas totes, I was more prepared and scheduled that post to go live hours before I actually wanted it to be seen. That worked better! Out of the 4 posts I've boosted, that one saw the most engagement.

Here is how Boosted posts work:

1. Click the "boost post" button on any of your page's posts.
2. Choose the type of targeting you want. This is indicated by the red arrow in the following screenshot:


You can choose to show your post to the people who like your page (which is maddening to me, they should already be seeing it!) or to a target audience that you choose. I normally choose a target audience, because my products are specific to a certain group of people. Just follow the prompts to choose your target audience.

3. The next important step is to set your budget. That is indicated in yellow in the screenshot above. This was the default amount of $160. It is estimated to reach 22,000-59,000 people. Sounds great, right? But I'm cheaper than that. :) You can set your budget for as little as $1, but obviously the less you spend, the smaller your audience will be. I normally choose $5 - $10 as shown below:


Many times the estimated audience is lower than what the post actually reaches. Here is an example of one of my campaigns. Halfway through, I had reached 1,837 people and had $3.58 left.


By the end of the campain (when all the money was used up!) I had reached 3,878 people, which was over the estimated audience. I'll take it!


Have I seen a lot of new traffic and/or sales from these boosted posts? I honestly don't know. I have gotten some new likes on my page, and interacted with some new people. I don't know if any of my sales have come as a direct result of these boosted posts, but the potential is always there!

My takeaway from these experiences is that I will continue to use the boost feature for posts and opportunities that seem worth the money. I may not make a fortune off it but I'm not spending a fortune, either!

Now I'd love to hear your thoughts. Have you ever used the boost feature? How did it work out for you? If you haven't, would you ever consider it, and why or why not? I can't wait to hear your opinions and ideas!


Linked up with Weekend Wind-Down, Friday's Unfolded, Say G'Day, The Creative Collection, DIY Dreamer, Hit Me with your Best Shot

Wednesday, March 26, 2014

Tips for Working with Burlap

It has been a few weeks since I posted the first burlap totes in my Etsy shop. Burlap is so "in" right now, and so pretty in just about any decor!! The "teaser" pictures that I shared on our Facebook page got a LOT of comments and interactions, so judging from the response, you gals love burlap, too!


But working with burlap is SO WAY different than any medium I have ever used before. My prep time for these totes is about double what it is for a quilted tote. It is fun to see the natural burlap fibers bend in submission to my machine needle and become a beautiful tote. Definitely worth the extra work!

I read a bunch of posts about working with burlap before I started, and here are the tips that seem to work for me.

To start with, I have used two types of burlap so far:

Natural burlap, which is tan in colour and usually has a unique smell. Did you know that burlap in this state is compost-able? You can add your scraps to your compost pile and they will break down over time like any natural fiber. Burlap makes a great option if you want a "green" product.


White burlap. This does not have as strong a smell and seems to be treated in some way (or dyed) to be made white. There are lots of different colours of burlap availabe these days (I've seen red, green, and blue, as well as chevron patterns and text prints, so anything is possible!) but these are all treated and not natural, which means you shouldn't put them in your compost pile.


Here is the process I put the burlap through before I can use it to make a tote:

When I first purchase the burlap, I make sure it doesn't come into contact with any other fabric. The reason is that initially, the burlap "sheds" like crazy! I keep it wrapped in plastic to contain the fibers.

Step numero uno is to throw it in the washing machine. I wash a couple yards at a time and can put the white and natural burlap together in the washer without incident. I normally put a splash of detergent in as well.

To me, it seems like the burlap is just going to disintegrate if I wash it! But the fibers are actually really sturdy and tough. Consider this: burlap sacks are filled with 50lbs of beans or grains on a daily basis. If they can hold that much weight, they can probably withstand the washing machine! :) Some people wash their pieces 2 or 3 times to soften them up even more.

When the pieces come out of the washer, they are covered in fuzz from the fibers. I have found that most of those fibers don't collect in the washing machine, they stay tangled up in the burlap pieces, so there is no danger of getting your machine dirty or seeing those fibers on the next load of laundry.

I hang the pieces of burlap over a clothes hanger to dry. By keeping it nice and straight on the hanger, it dries straight. Normally when I purchase the burlap, it comes off the bolt crooked. By washing it and hanging it up to dry, it straightens out on its own.


Now how do I get all that fuzz off?

At first, I tried taking it outside while it was still wet and giving it a good snap. This might work...but not in freezing temperatures. Imagine my surprise when it instantly froze! Good 'ol Maine weather for ya! :)

Instead, I vacuum it off after it has dried. Yes, I vacuum it. Then I use a lint roller to get even more fine fuzz off every side. It takes several sheets of the lint roller, but this really works well!

During the process of putting a tote together, there is some shedding. I just use a damp rag to wipe down my work space before switching to a different project with cotton fabric.

Once I've made a burlap tote, there is very minimal shedding. I've been using this tote as a Bible bag for weeks, and so far no shedding! I am always wearing a wool coat, and even that doesn't pick up any white fuzz, so I call this method a success. Yay for successes!!

I'd love to hear if you have worked with burlap before, and what steps you take to prep your burlap for crafts. Will you try these tips I've shared? Let me know how they work!

I consulted several other blogs before working with burlap...here are some links I found helpful:
Notes From The Patch
Starshine Salon
Crafting a Green World
Southern Abbey
Stone Gable


I linked up with the Link Party Palooza, The DIY Dreamer and Weekend Wind-Down Party

Tuesday, February 18, 2014

Replacing A Coat Zipper

Recently I was asked to replace a few broken coat zippers, and I snapped a few pictures to share the process with you! I only documented this one method - I wish I had taken pictures of all three, because each one was a little bit different!

This one was a lined winter coat, but only one zipper needed replacing...the main one on the outer jacket.


Here is the broken zipper...

Here is an inside shot. There is a second zipper to attach the lining of the coat, but that one didn't need replacing.

Normally when replacing a zipper, I would take apart the seam holding in the old zipper and put in the new one exactly as the old one was. This one caused a problem, however. In order to take out the old zipper, I would have had to rip out...

That would have been a lot of ripping and I was nervous about getting it all back on correctly. Not to mention a whole second zipper to sew back on in the correct spot. So, I totally cheated.

I started by cutting off the teeth of the old, broken zipper.

This left me with a small strip of the old zipper left in the seam to secure the new zipper to.

I sewed the new zipper on with right sides together. The zipper will seem backwards, like the teeth are facing the wrong direction, but we aren't done yet. :)

The purple is the new zipper...the teal is the old one.

Here is the new zipper sewed on initially...see how the teeth are backwards? Let's fix that!

The last step is to turn the wrong end of the zipper in towards the inside of the coat and sew. I just followed the original stitching.


Repeat with the other side of the zipper.

This method does leave a small strip of the old zipper visible. It wouldn't be at all noticeable if the old and new zippers were the same colour. I was unable to find a new one the same shade of teal, which is why I went with the purple instead. However, with the colour blocking on this coat I think it looks fine! It almost looks like a bit of piping next to the zipper.

Here is the inside with the new zipper.

One trick of mine when putting in a new zipper is to save any type of zipper pull from the old one and attach it to the new one. This makes the zipper look original to the coat.

That is all...super easy! Now there is no reason not to tackle those broken zippers in your pile of mending. :) If I can help you with a specific project, let me know, I'd be glad to give answers if I can!

Also, I purchased these zippers from ZipperStop on Etsy. Not the shop I normally use, but they had the most options for puchasing separating zippers at the exact sizes I needed for these coats. They were easy to work with and actually sent me a free zipper when the first one wasn't exactly the right colour. I am a satisfied customer of ZipperStop!

What mending project seems like a daunting task to you? Have you ever put in a replacement zipper? How did it go?


Linked up with the Weekend Wind-Down party

Wednesday, October 30, 2013

So Sew! Day 30: Sewing on a Button

Welcome to day 30 of our 31 Days sewing series! Lets learn how to sew on a button.


New here? I'm glad you are visiting! You may want to follow this blog so you don't miss miss a post!


Everyone needs to know how to sew on a button. I've even taught my brother how to do it! It is a simple task that takes second to accomplish, so it needn't be put off any longer.

Today I'm showing you how to sew on two different style buttons. Ready? The first is a typical 4-hole button. The same method applies to one with two holes.

Thread your needle, and tie a knot in the ends, doubling the thread.


Line up your buttonhole with the spot you want your button to go. Stick your threaded needle down through the buttonhole and the fabric underneath. This marks the spot for the button clearly!


Bring your needle back up through the fabric in this spot...


..and put the button on it.


The rest is pretty self-explanatory...


As a last precautionary step, push your needle back up through the fabric, but not through any buttonholes.


Wind the thread around what has already been sewn. It only needs to be wound a couple of times around, and this is supposed to reinforce it a bit more. {though I don't really have any concrete evidence that it does! Your thoughts?}


Tie a knot in the thread, and this button is complete and sewn on!


Now lets take a quick look at a button without holes, just a ring in the back. This kind of button is used on things like coats or fancier clothing sometimes, because the thread doesn't show.

Begin the same way, but when you pull the needle up through the fabric, thread it through the ring in the back of the button.


Then push your needle back down through the fabric, pulling the button against the fabric.


Repeat these steps a few more times to secure the button on.


Tie a knot in your thread, and you're done!


Challenge: You don't have any excuses any more. Go tackle that mending pile that is waiting for stray buttons! Do you find this to be tedious work, or something easy?


Other posts in this series:

Tuesday, October 29, 2013

So Sew! Day 29: Putting in a Buttonhole

Welcome to day 29 of our 31 Days sewing series! Lets learn how to make a buttonhole.


New here? I'm glad you are visiting! You may want to follow this blog so you don't miss miss a post!

Today's tutorial explains how to make a buttonhole in a garment. Your machine will probably be a bit different than mine, but hopefully this will help you get an idea of how it works. This is one project when I can honestly say your machine does most of the work. Gotta love that, right? =)

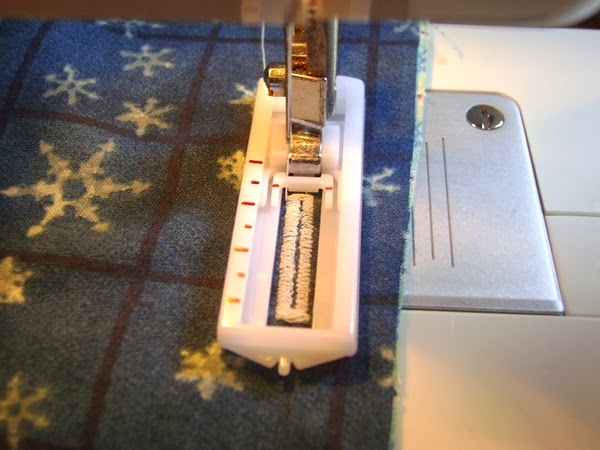
To put in a buttonhole, you need a special foot for the job. Here is a picture of mine:


It attaches to the machine just like any other foot. Here it is compared to a regular presser foot.


Practically the only work you have to do with this is the prep work. Measure how big a buttonhole you'll need. If you are using a pattern, it will have the exact measurements and position on the pattern. If not, just measure and mark it yourself.


I also have to measure that length on my foot, to know how to line it up.


Put the foot on the machine and line it up with the marks on your fabric. Start at the top of the buttonhole.


Here are the settings on my machine dials for this stitch. The stitch length dial needs to be in the red, which means a very close stitch.


My stitch dial actually has 3 different settings for this stitch. I start in position 1 - a very good place to start. :)


 Start sewing. The machine will make tiny stitches down the right side of the foot.


When you get to the bottom, change the dial to position 2/4:


This will make stitches across the whole width of the bottom of the buttonhole. Make as many as you want!


Then change the dial to position 3, and the machine will automatically go backward making stitches up the left side.


Lastly, put the dial back in position 2/4 again and make some stitches across the top. Then because I feel my machine doesn't make close enough stitches, I go around one more time to make sure this thing is going to hold for the long haul.


This finishes the sewing part. See how the machine did it all? All you have to do is turn the dial!


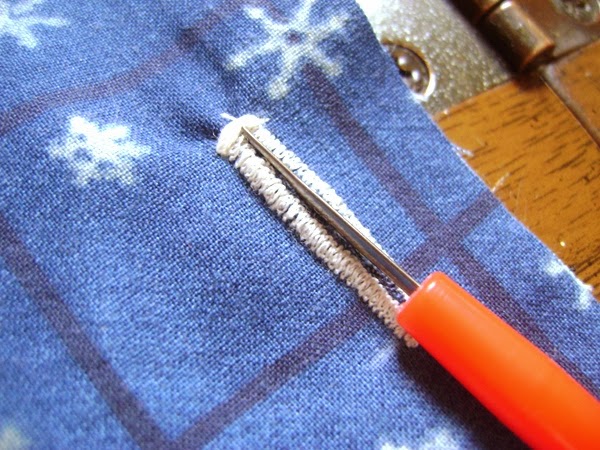
Now just open that buttonhole up in the middle. I find using a seam ripper is the easiest way.


Aaaand, you're done! Great job!


Challenge: Read your machine's manual to find out how your buttonholer operates. Test it out a few times on some scrap fabric. Do you find it easy or complicated? What are the settings for your machine?


Other posts in this series: